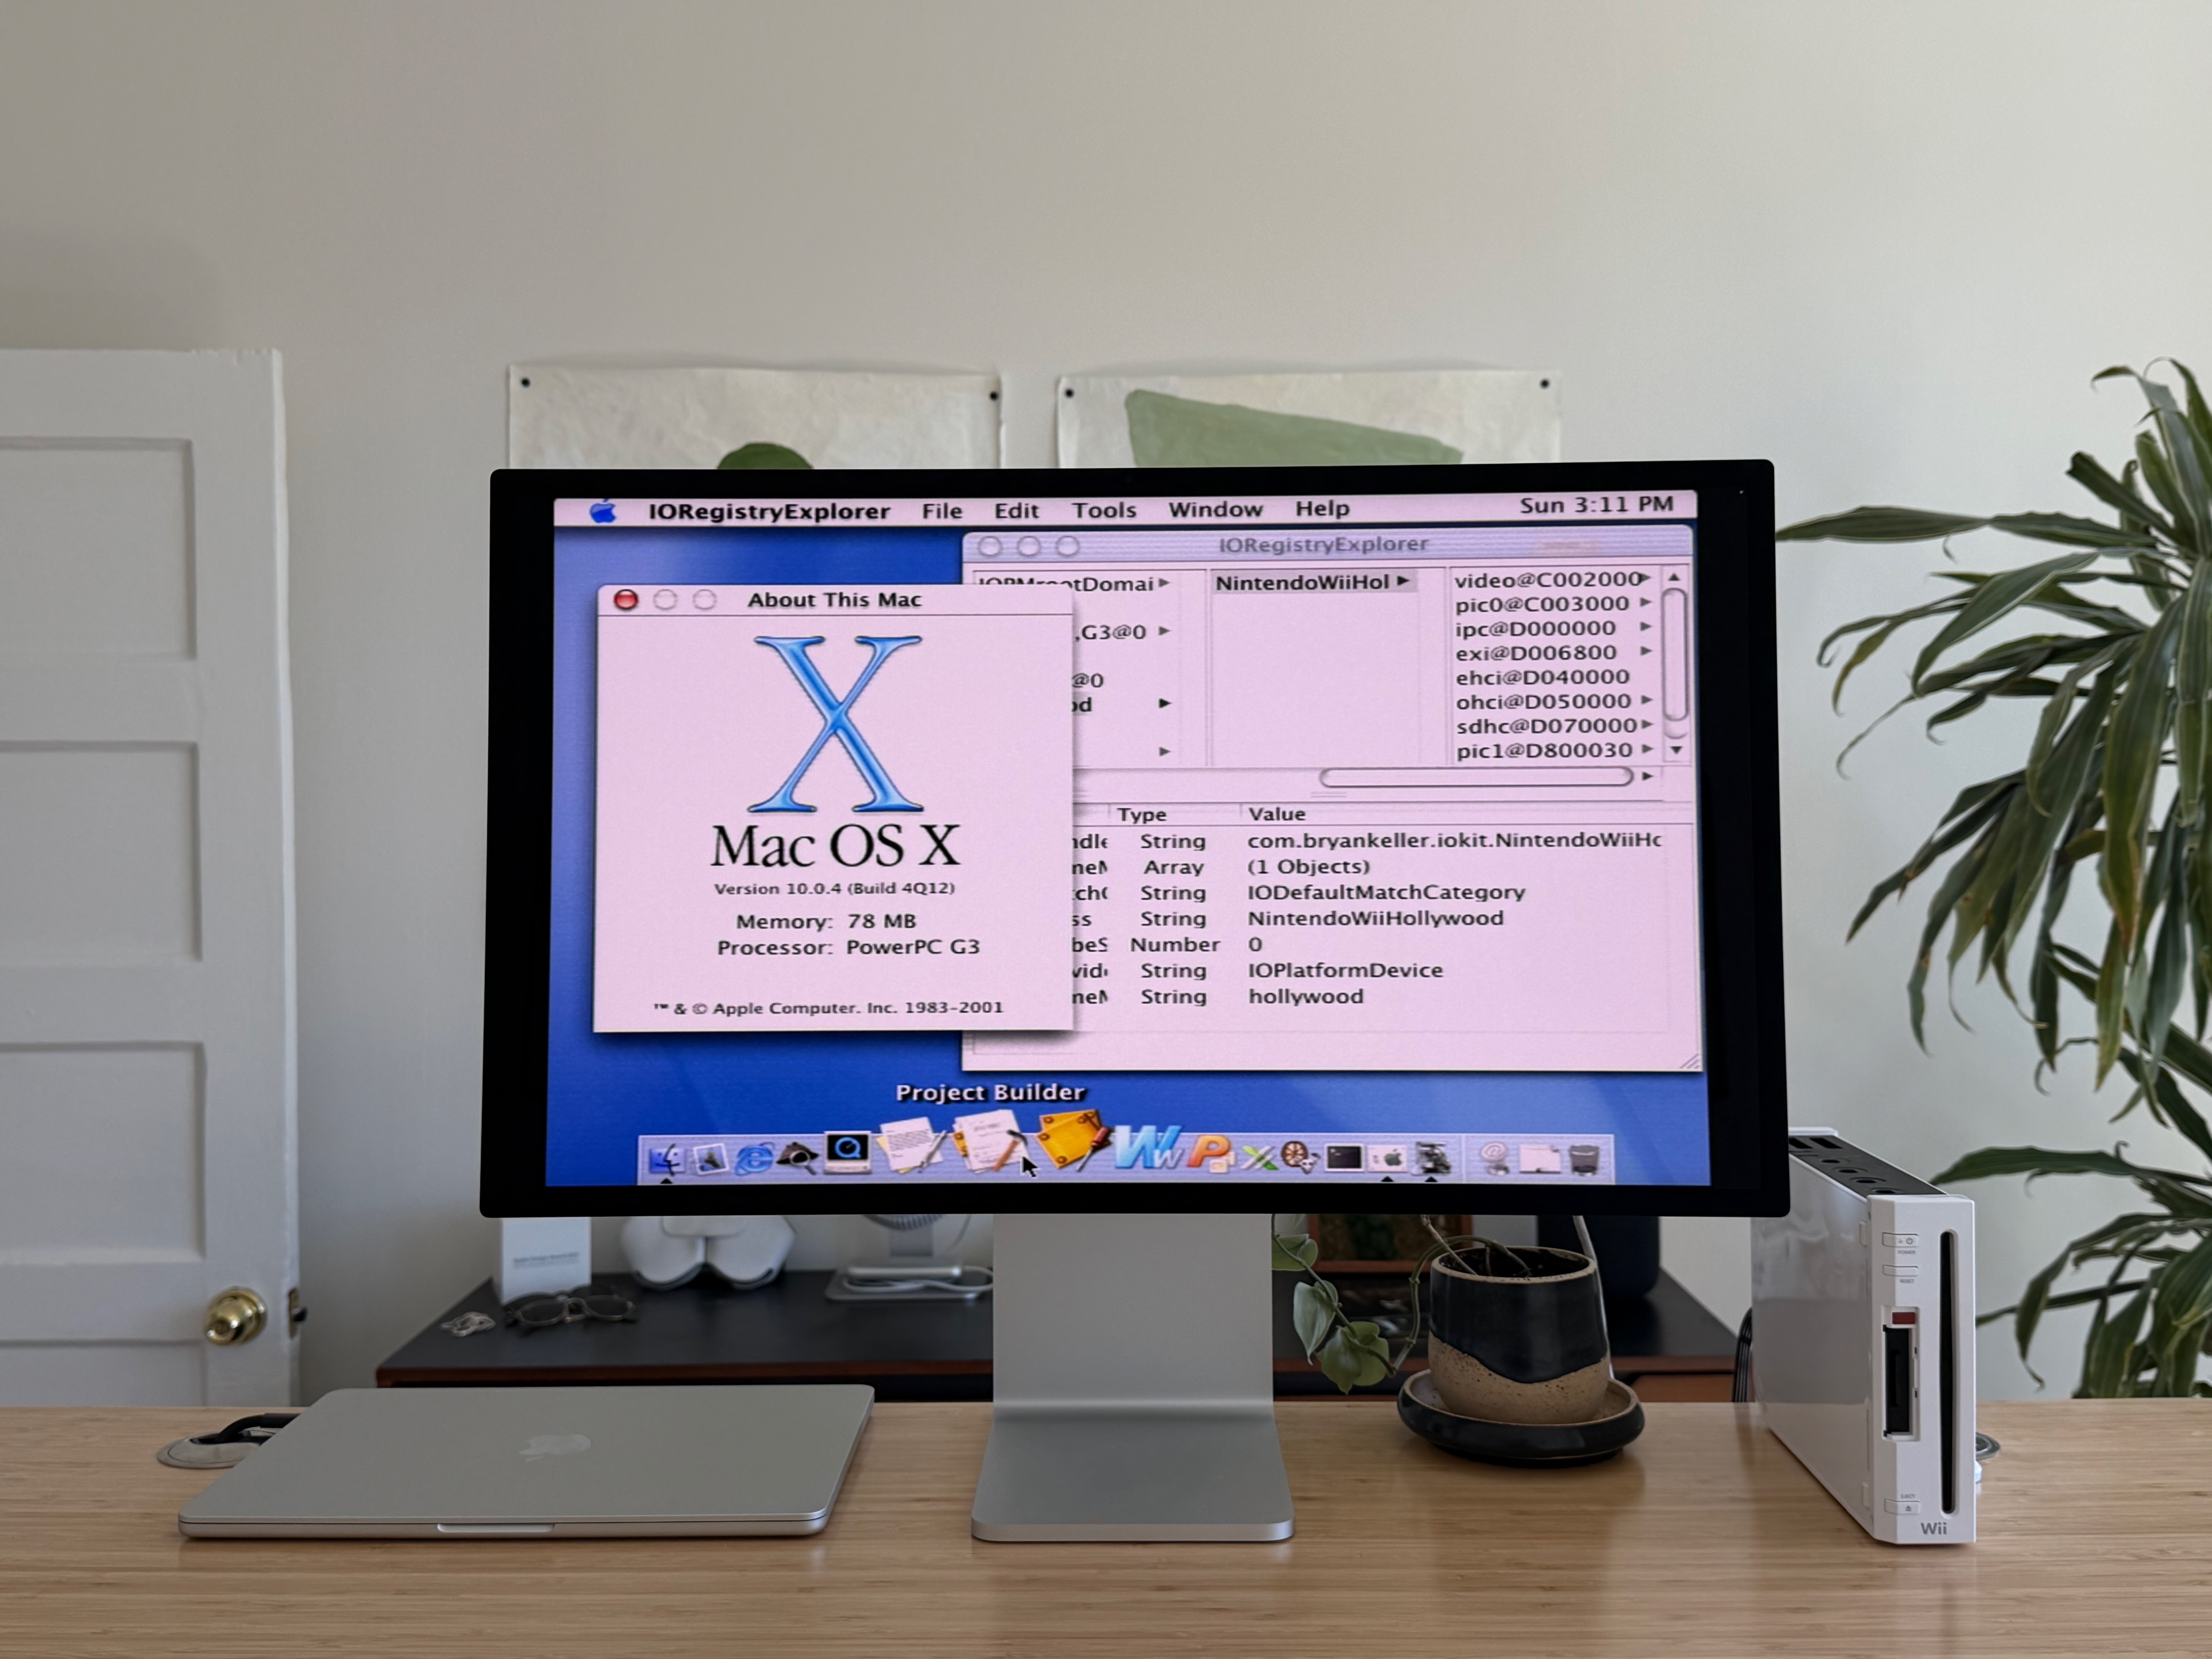
 Mac OS X 10.0 (Cheetah) running natively on the Nintendo Wii
Since its launch in 2007, the Wii has seen several operating systems ported to it: Linux, NetBSD, and most-recently, Windows NT. Today, Mac OS X joins that list.
In this post, I’ll share how I ported the first version of Mac OS X, 10.0 Cheetah, to the Nintendo Wii. If you’re not an operating systems expert or low-level engineer, you’re in good company; this project was all about learning and navigating countless “unknown unknowns”. Join me as we explore the Wii’s hardware, bootloader development, kernel patching, and writing drivers - and give the PowerPC versions of Mac OS X a new life on the Nintendo Wii.
Visit the wiiMac bootloader repository for instructions on how to try this project yourself.
Feasibility Investigation
  Before figuring out how to tackle this project, I needed to know whether it would even be possible. According to a 2021 Reddit comment:

    There is a zero percent chance of this ever happening.

  Feeling encouraged, I started with the basics: what hardware is in the Wii, and how does it compare to the hardware used in real Macs from the era.
Hardware Compatibility
The Wii uses a PowerPC 750CL processor - an evolution of the PowerPC 750CXe that was used in G3 iBooks and some G3 iMacs. Given this close lineage, I felt confident that the CPU wouldn’t be a blocker.
As for RAM, the Wii has a unique configuration: 88 MB total, split across 24 MB of 1T-SRAM (MEM1) and 64 MB of slower GDDR3 SDRAM (MEM2); unconventional, but technically enough for Mac OS X Cheetah, which officially calls for 128 MB of RAM but will unofficially boot with less. To be safe, I used QEMU to boot Cheetah with 64 MB of RAM and verified that there were no issues.
Other hardware I’d eventually need to support included:
- Serial debug output via a USB Gecko
- The SD card for booting the rest of the system once the kernel was running
- Interrupt controllers
- Video output via a framebuffer that lives in RAM
- The Wii’s USB ports for using a mouse and keyboard
Convinced that the Wii’s hardware wasn’t fundamentally incompatible with Mac OS X, I moved my attention to investigating the software stack I’d be porting.
Software Compatibility
Mac OS X has an open source core (Darwin, with XNU as the kernel and IOKit as the driver model), with closed-source components layered on top (Quartz, Dock, Finder, system apps and frameworks). In theory, if I could modify the open-source parts enough to get Darwin running, the closed-source parts would run without additional patches.
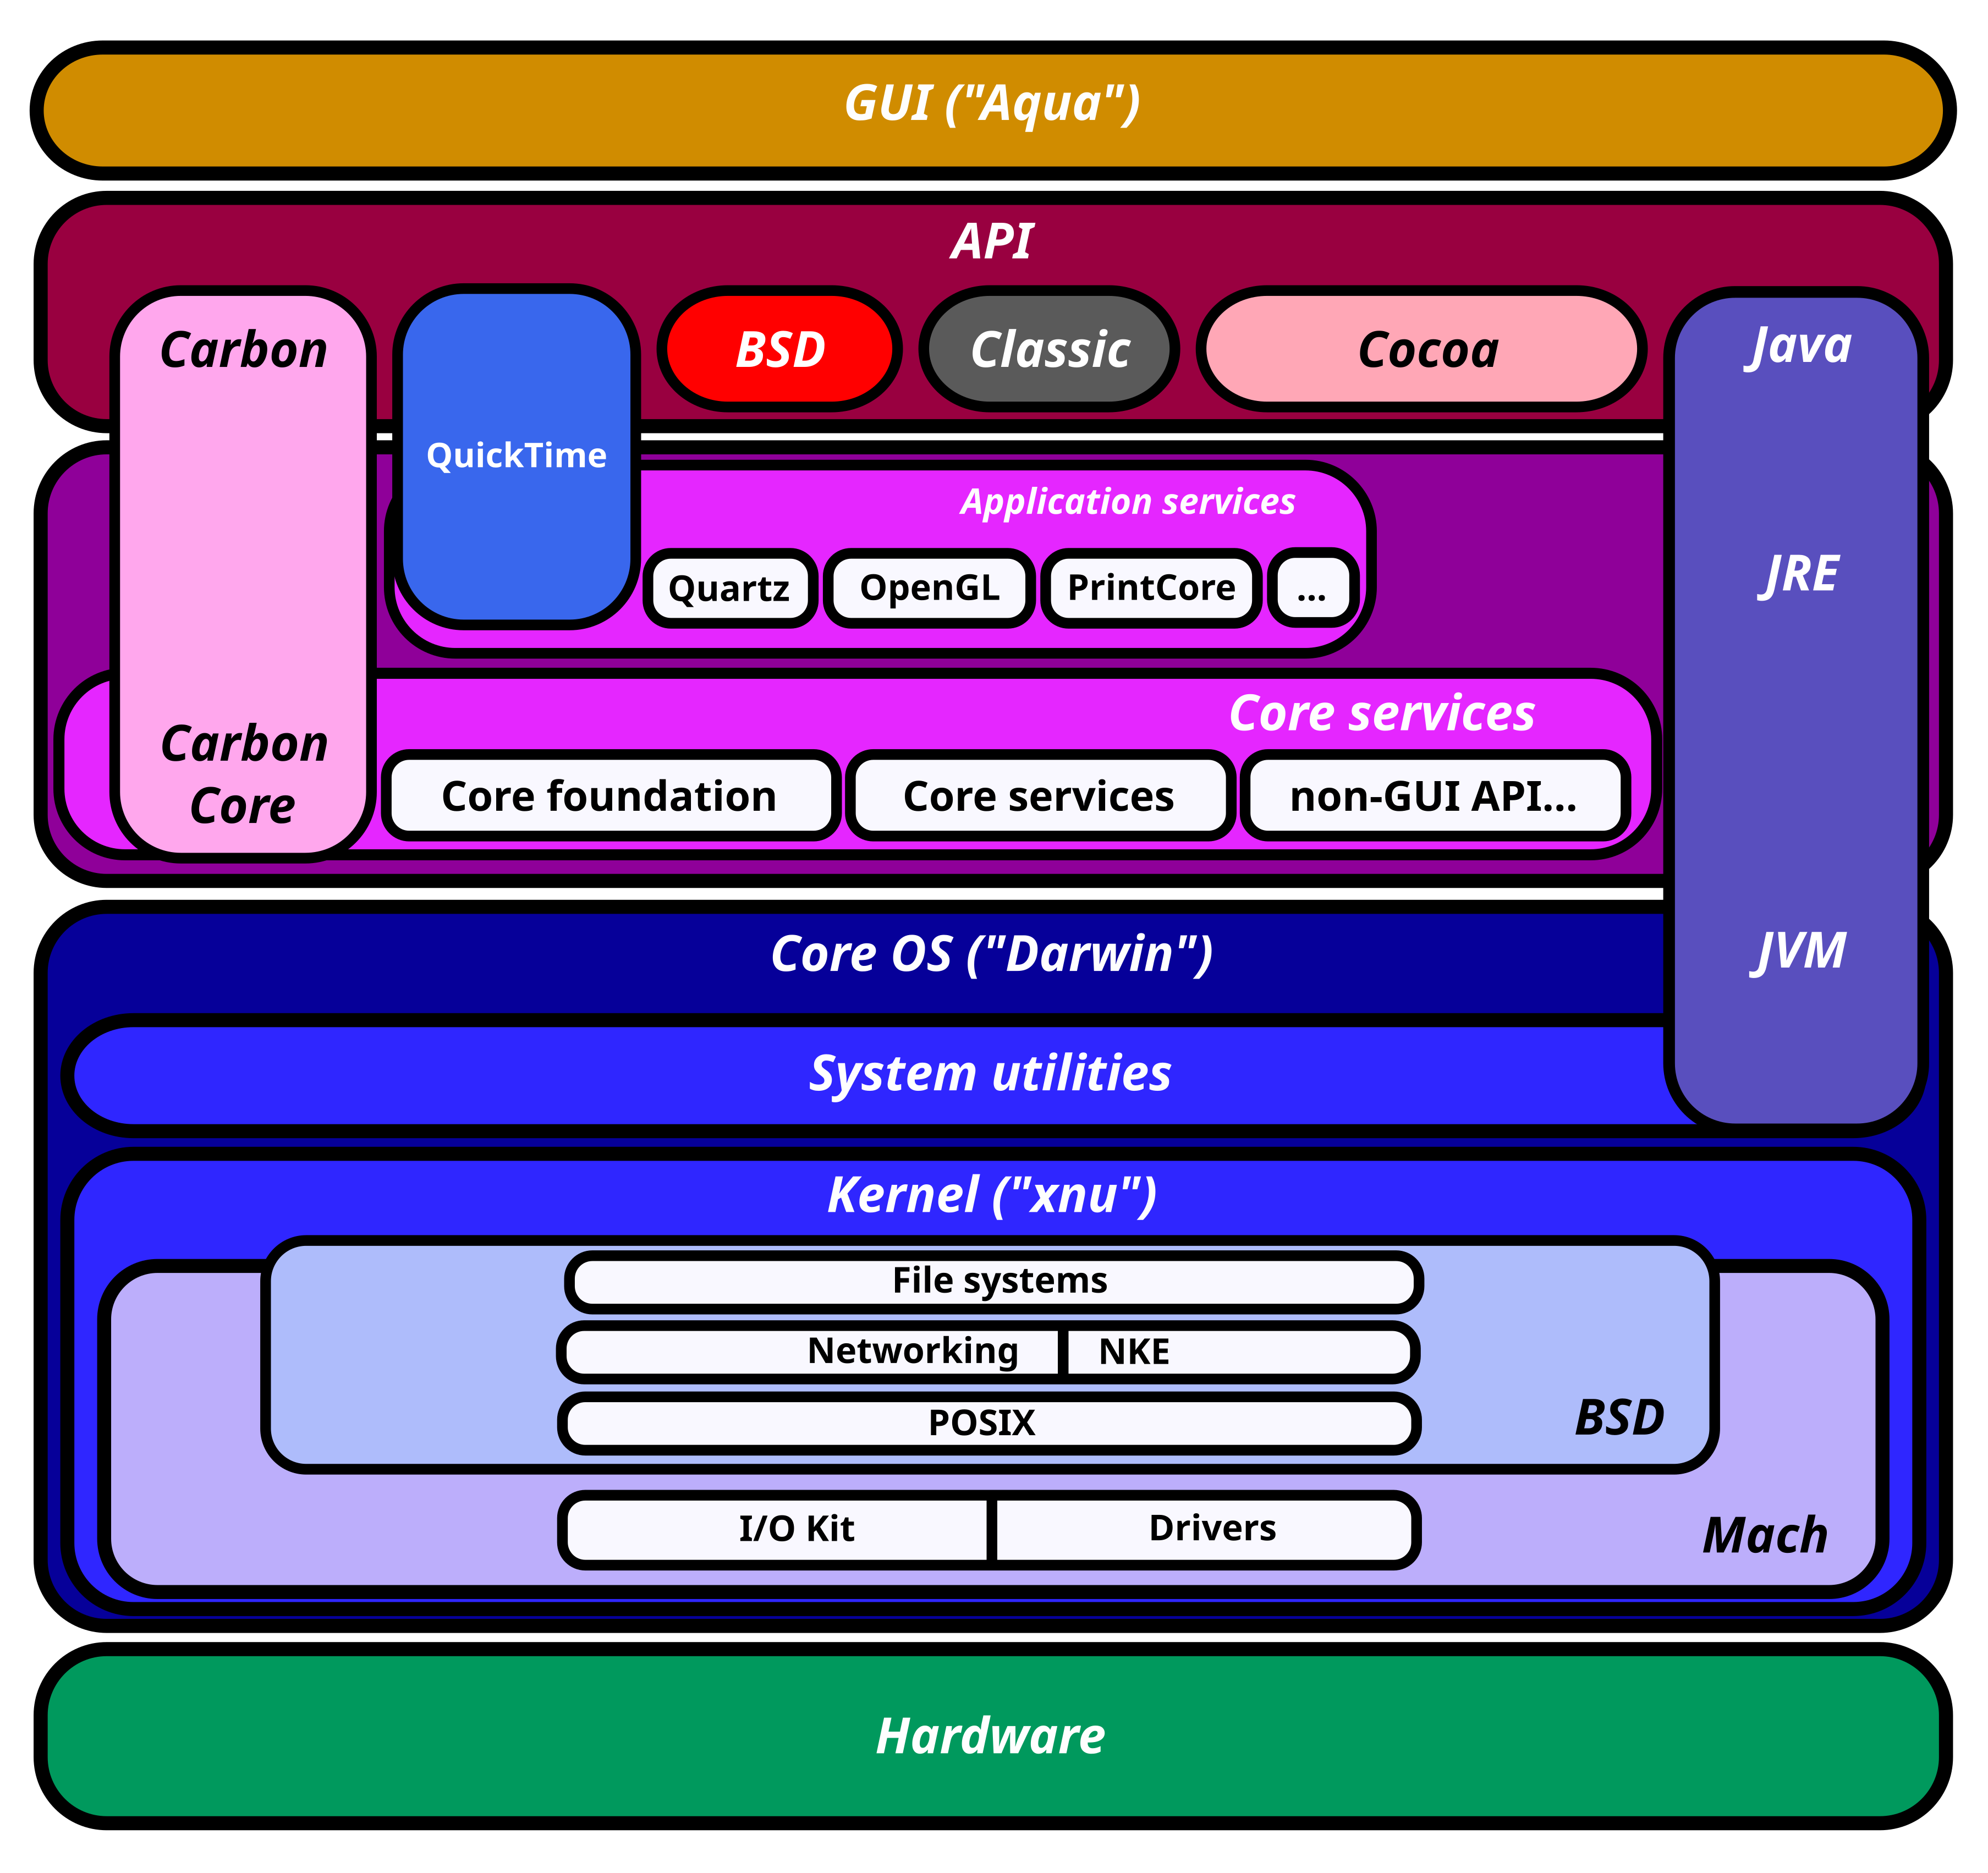 Source: Wikipedia: Architecture of macOS
Porting Mac OS X would also require understanding how a real Mac boots. PowerPC Macs from the early 2000s use Open Firmware as their lowest-level software environment; for simplicity, it can be thought of as the first code that runs when a Mac is powered on. Open Firmware has several responsibilities, including:
- Hardware detection and configuration
- Device tree construction (based on the detected hardware)
- Providing useful functions for I/O, drawing, and hardware communication
- Loading and executing an operating system bootloader from the filesystem
Open Firmware eventually hands off control to BootX, the bootloader for Mac OS X. BootX prepares the system so that it can eventually pass control to the kernel. The responsibilities of BootX include:
- Reading the device tree from Open Firmware
- Loading and decoding the XNU kernel, a Mach-O executable, from the root filesystem
- Passing control to the kernel
Once XNU is running, there are no dependencies on BootX or Open Firmware. XNU continues on to initialize processors, virtual memory, IOKit, BSD, and eventually continue booting by loading and running other executables from the root filesystem.
The last piece of the puzzle was how to run my own custom code on the Wii - a trivial task thanks to the Wii being “jailbroken”, allowing anyone to run homebrew with full access to the hardware via the Homebrew Channel and BootMii.
Porting Approach
Armed with knowledge of how the boot process works on a real Mac, along with how to run low-level code on the Wii, I needed to select an approach for booting Mac OS X on the Wii. I evaluated three options:
- Port Open Firmware, use that to run unmodified BootX to boot Mac OS X
- Port BootX and modify it to not rely on Open Firmware, use that to boot Mac OS X
- Write a custom bootloader that performs the bare-minimum setup to boot Mac OS X
Since Mac OS X doesn’t depend on Open Firmware or BootX once running, spending time porting either of those seemed like an unnecessary distraction. Additionally, both Open Firmware and BootX contain added complexity for supporting many different hardware configurations - complexity that I wouldn’t need since this only needs to run on the Wii. Following in the footsteps of the Wii Linux project, I decided to write my own bootloader from scratch. The bootloader would need to, at a minimum:
- Initialize the Wii’s hardware
- Load the kernel from the SD card
- Construct a device tree and boot arguments
- Pass control to the kernel
Once the kernel was running, none of the bootloader code would matter. At that point, my focus would shift to patching the kernel and writing drivers.
Writing a Bootloader
I decided to base my bootloader on some low-level example code for the Wii called ppcskel. ppcskel puts the system into a sane initial state, and provides useful functions for common things like reading files from the SD card, drawing text to the framebuffer, and logging debug messages to a USB Gecko.
Loading the Kernel
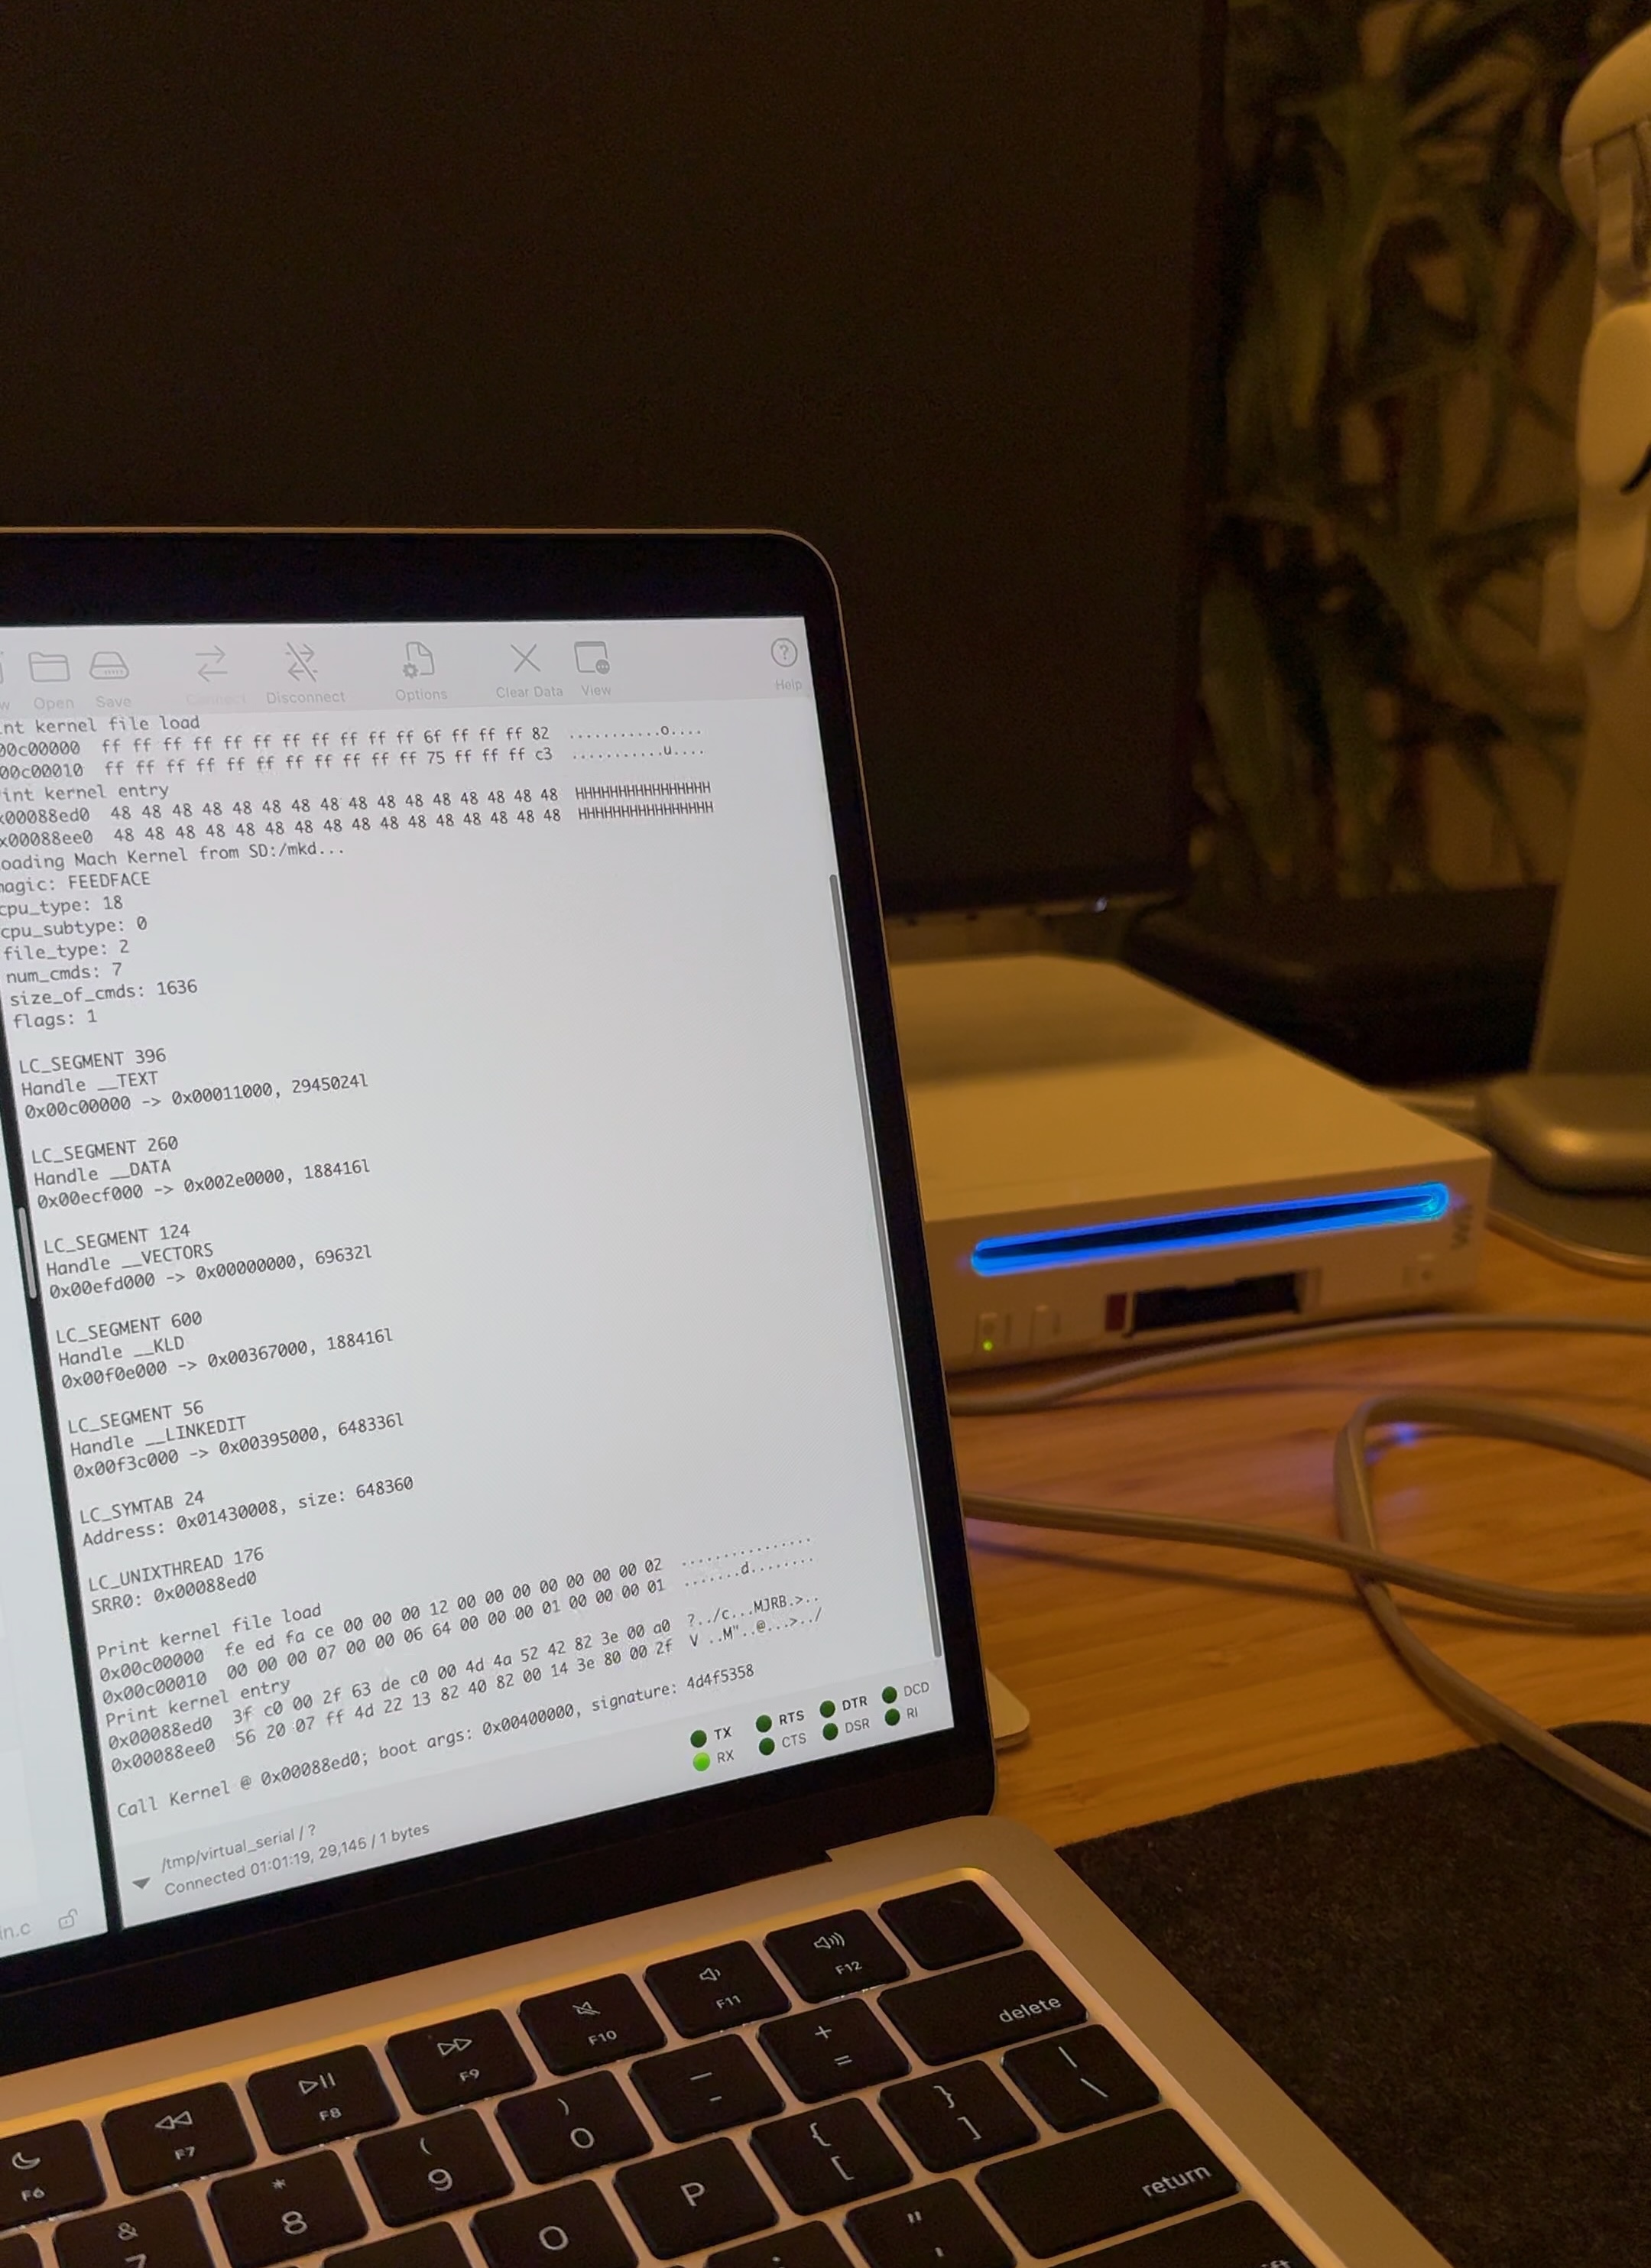
Next, I had to figure out how to load the XNU kernel into memory so that I could pass control to it. The kernel is stored in a special binary format called Mach-O, and needs to be properly decoded before being used.
The Mach-O executable format is well-documented, and can be thought of as a list of load commands that tell the loader where to place different sections of the binary file in memory. For example, a load command might instruct the loader to read the data from file offset 0x2cf000 and store it at the memory address 0x2e0000. After processing all of the kernel’s load commands, we end up with this memory layout:
0x00000000: Exception vectors
0x00011000: LC_SEGMENT __TEXT
0x002e0000: LC_SEGMENT __DATA
0x00367000: LC_SEGMENT __KLD
0x00395000: LC_SEGMENT __LINKEDIT
0x00434000: LC_SEGMENT __SYMTAB
0x004d3000: LC_SEGMENT __HEADER
The kernel file also specifies the memory address where execution should begin. Once the bootloader jumps to this address, the kernel is in full control and the bootloader is no longer running.
Calling the Kernel
To jump to the kernel-entry-point’s memory address, I needed to cast the address to a function and call it:
(*(void (*)())kernel_entry_point)(boot_args_address, MAC_OS_X_SIGNATURE);
After this code ran, the screen went black and my debug logs stopped arriving via the serial debug connection - while anticlimactic, this was an indicator that the kernel was running.
The question then became: how far was I making it into the boot process? To answer this, I had to start looking at XNU source code. The first code that runs is a PowerPC assembly _start routine. This code reconfigures the hardware, overriding all of the Wii-specific setup that the bootloader performed and, in the process, disables bootloader functionality for serial debugging and video output. Without normal debug-output facilities, I’d need to track progress a different way.
The approach that I came up with was a bit of a hack: binary-patch the kernel, replacing instructions with ones that illuminate one of the front-panel LEDs on the Wii. If the LED illuminated after jumping to the kernel, then I’d know that the kernel was making it at least that far. Turning on one of these LEDs is as simple as writing a value to a specific memory address. In PowerPC assembly, those instructions are:
lis    r5, 0xd80        ; load upper half of 0x0D8000C0 into r5
ori    r5, r5, 0xc0     ; load lower half of 0x0D8000C0 into r5
lwz    r4, (r5)         ; read the 32-bit value from 0x0D8000C0
sync                    ; memory barrier
xori   r4, r4, 0x20     ; toggle bit 5
stw    r4, (r5)         ; write the value back to 0x0D8000C0
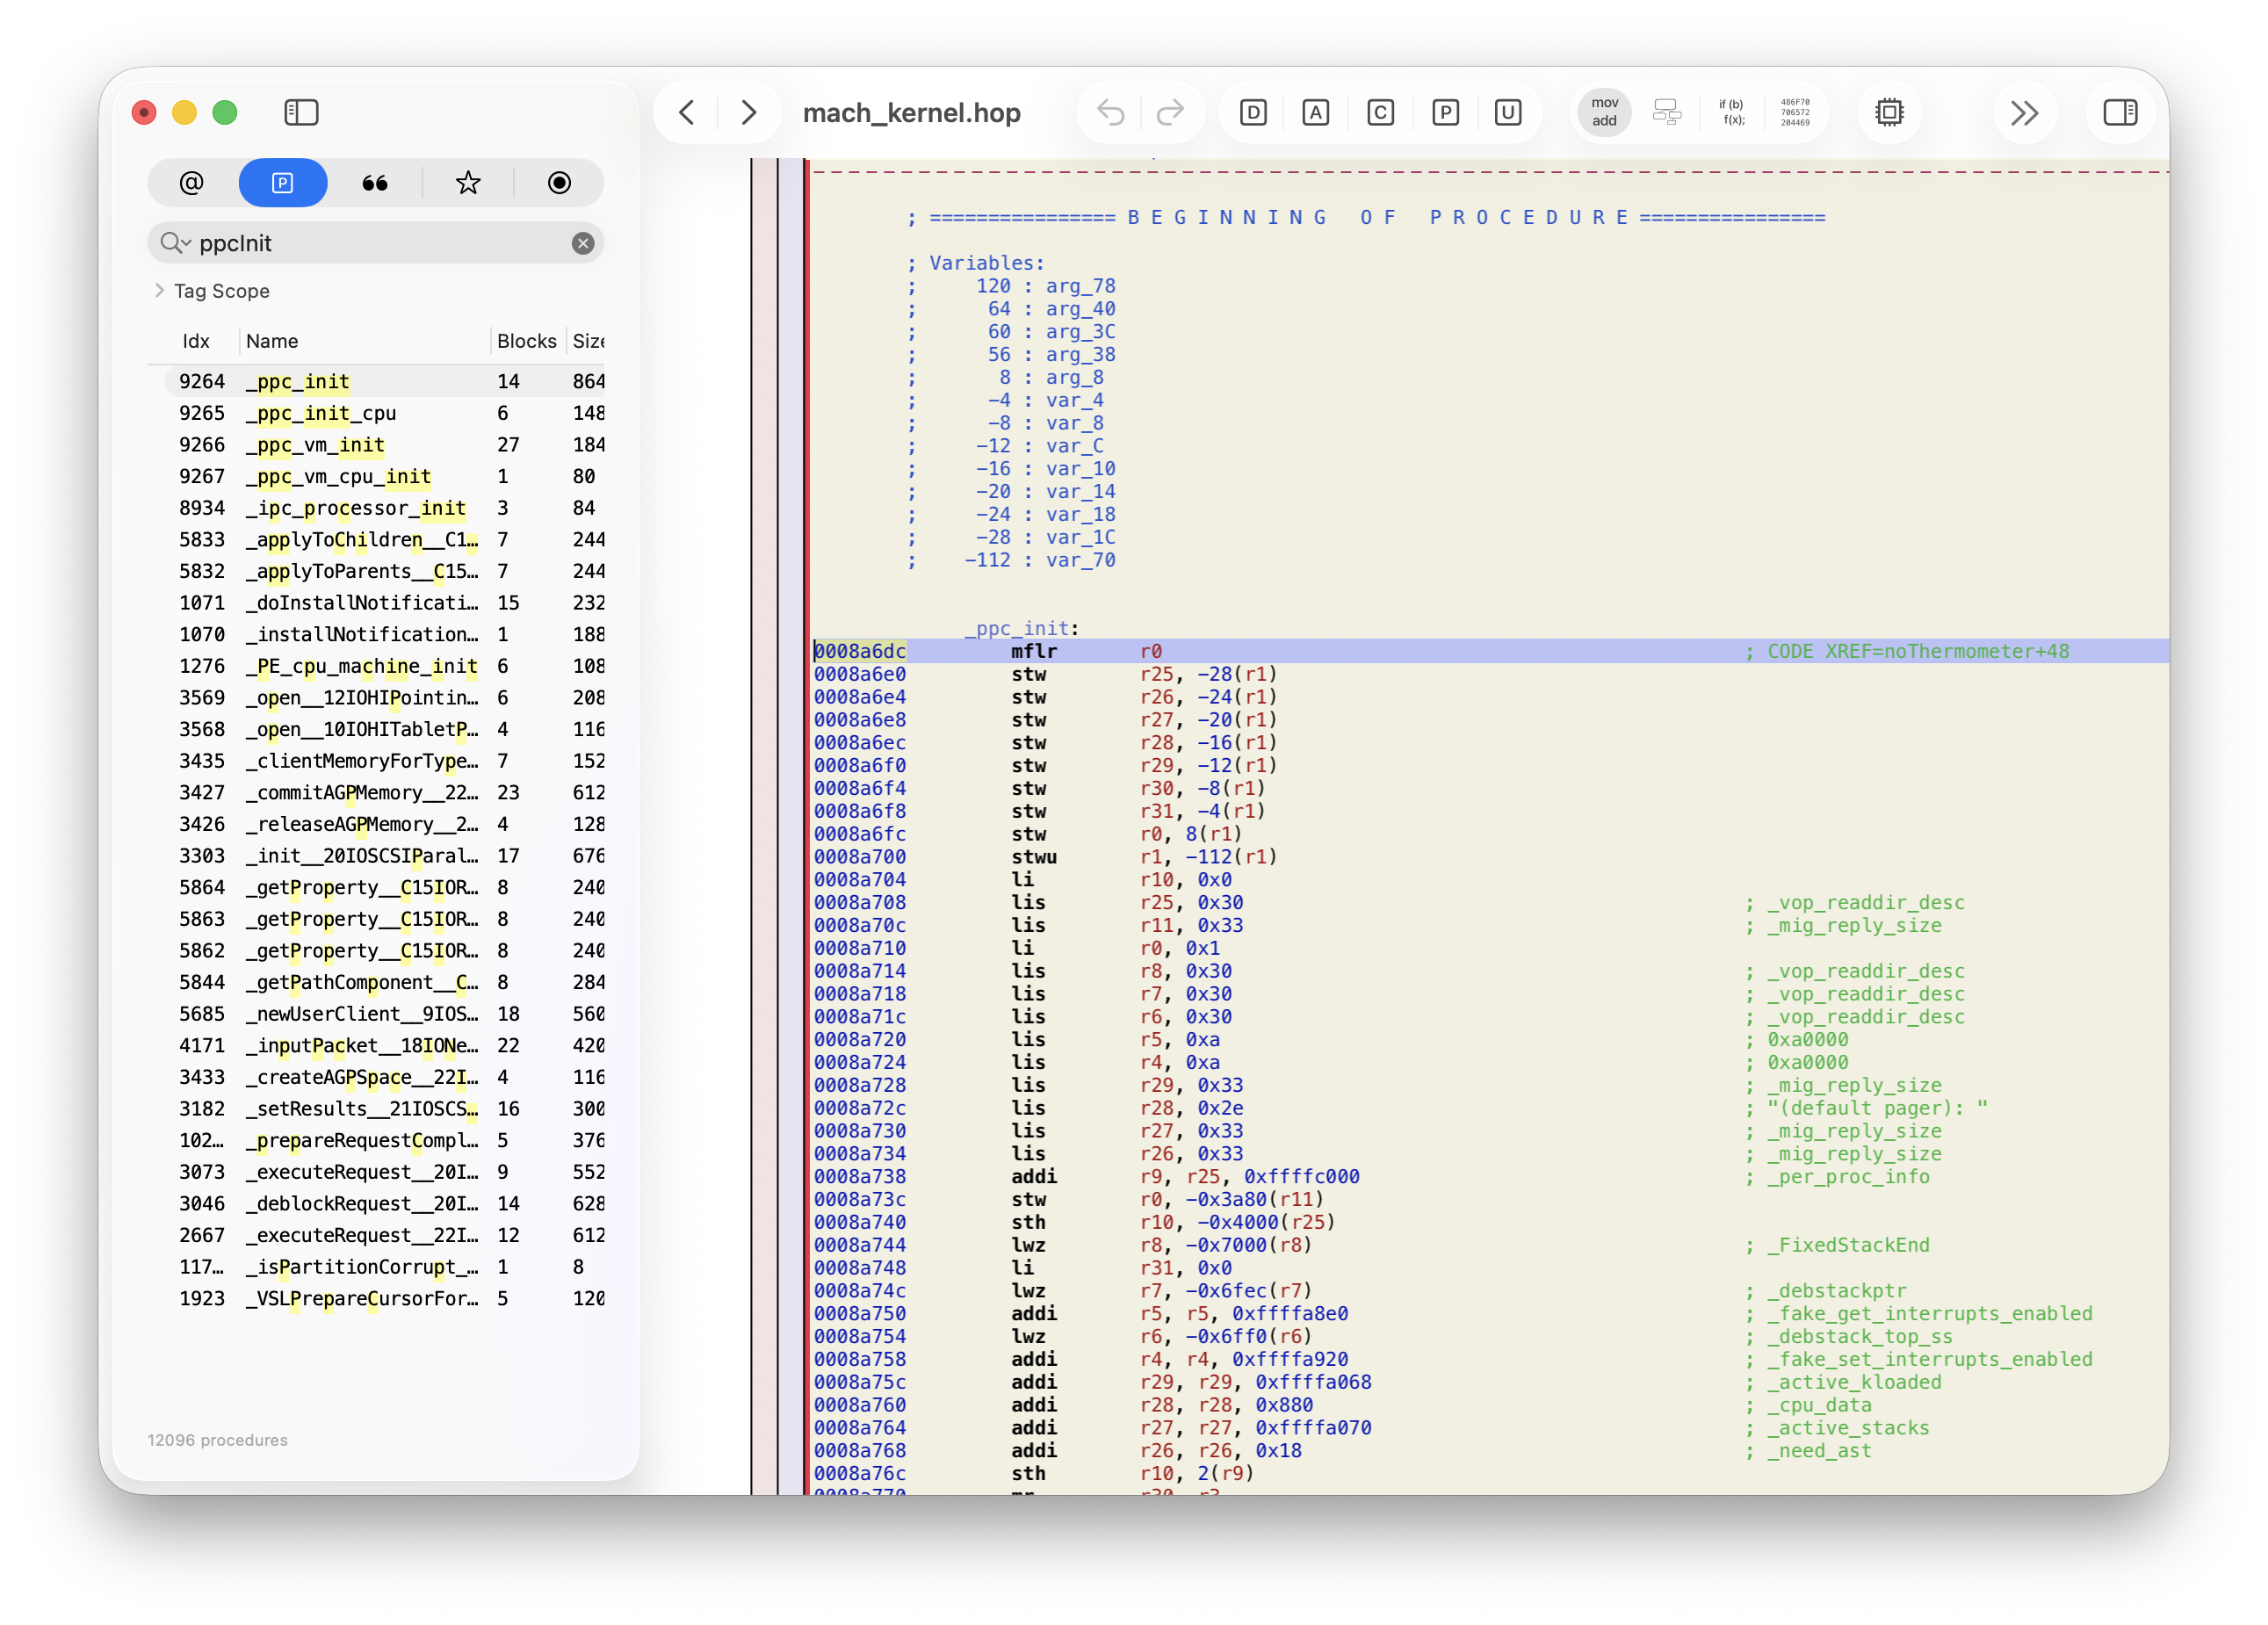
To know which parts of the kernel to patch, I cross-referenced function names in XNU source code with function offsets in the compiled kernel binary, using Hopper Disassembler to make the process easier. Once I identified the correct offset in the binary that corresponded to the code I wanted to patch, I just needed to replace the existing instructions at that offset with the ones to blink the LED.
To make this patching process easier, I added some code to the bootloader to patch the kernel binary on the fly, enabling me to try different offsets without manually modifying the kernel file on disk.
After tracing through many kernel startup routines, I eventually mapped out this path of execution:
1. start.s: start
2. start.s: allStart
3. start.s: nextPVR
4. start.s: donePVR
5. start.s: doOurInit
6. start.s: noFloat
7. start.s: noVector
8. start.s: noSMP
9. start.s: noThermometer
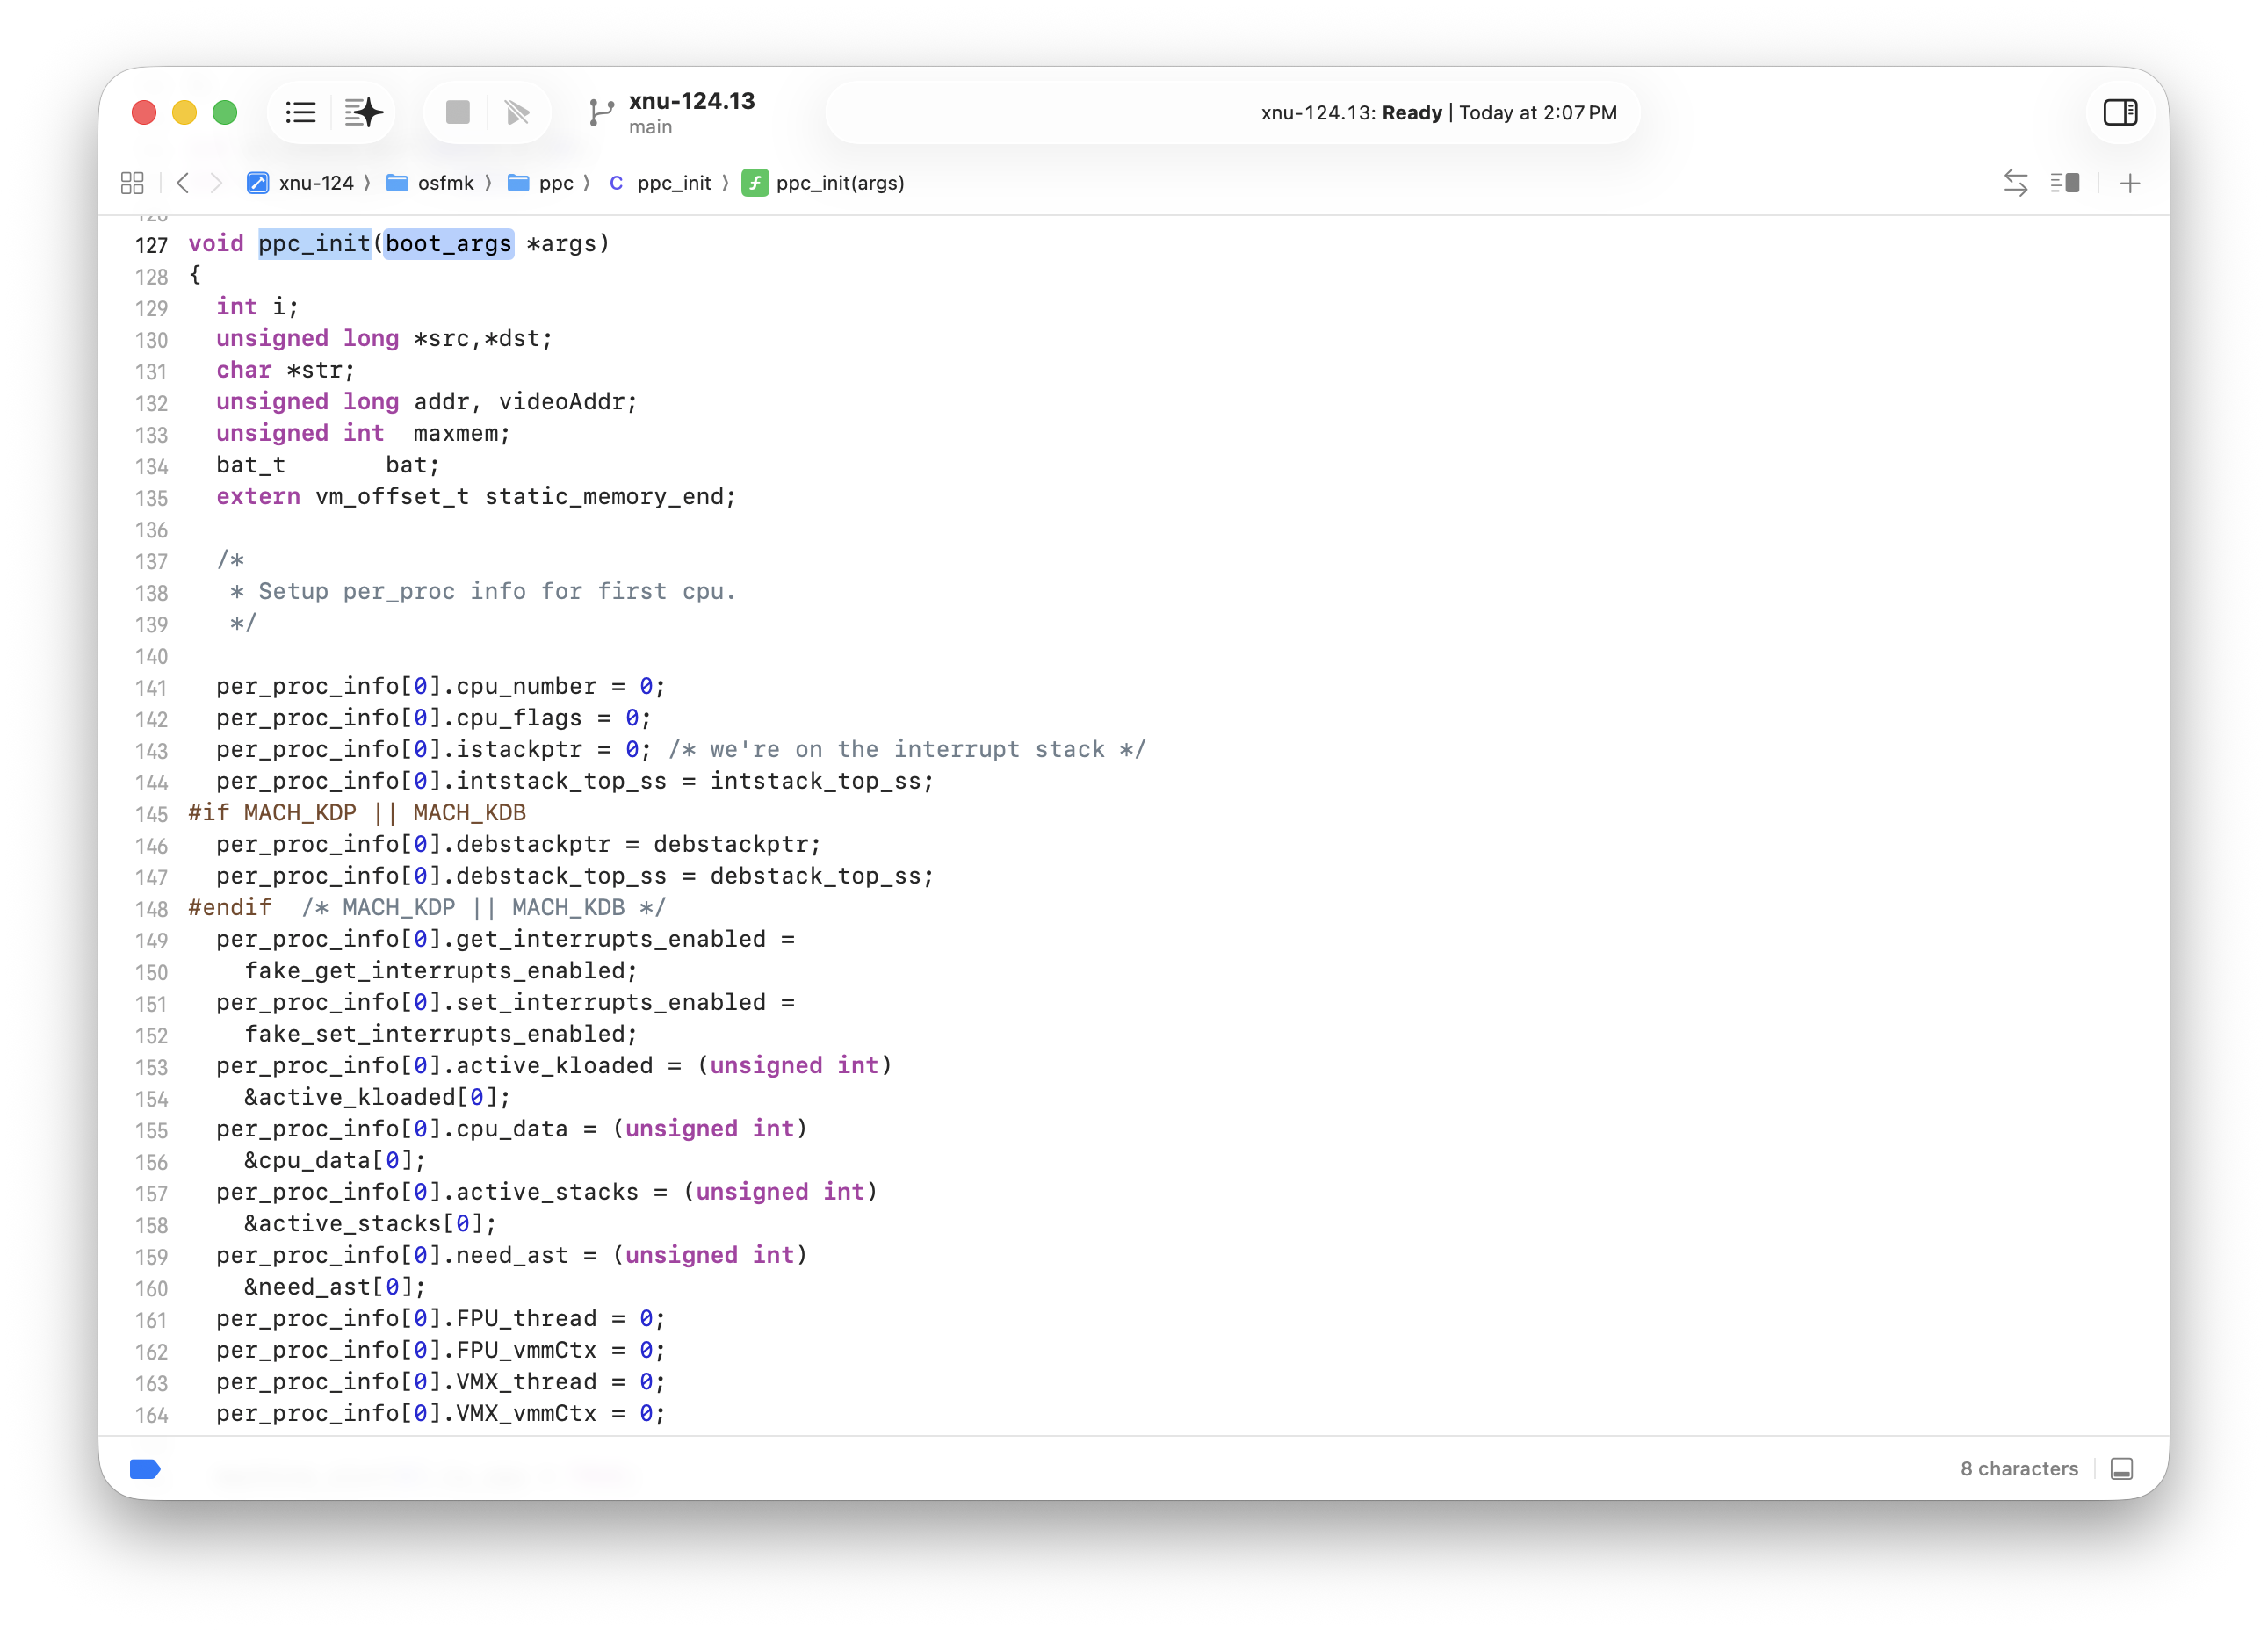
10. ppc_init.c: ppcInit
11. pe_init.c: PE_INIT_PLATFORM
12. device_tree.c: find_entry (crash with 300 exception)
This was an exciting milestone - the kernel was definitely running, and I had even made it into some higher-level C code. To make it past the 300 exception crash, the bootloader would need to pass a pointer to a valid device tree.
Creating and Passing a Device Tree
The device tree is a data structure representing all of the hardware in the system that should be exposed to the operating system. As the name suggests, it’s a tree made up of nodes, each capable of holding properties and references to child nodes.
On real Mac computers, the bootloader scans the hardware and constructs a device tree based on what it finds. Since the Wii’s hardware is always the same, this scanning step can be skipped. I ended up hard-coding the device tree in the bootloader, taking inspiration from the device tree that the Wii Linux project uses.
Since I wasn’t sure how much of the Wii’s hardware I’d need to support in order to get the boot process further along, I started with a minimal device tree: a root node with children for the cpus and memory:
/
└── cpus
    └── PowerPC,750
└── memory
My plan was to expand the device tree with more pieces of hardware as I got further along in the boot process - eventually constructing a complete representation of all of the Wii’s hardware that I planned to support in Mac OS X.
Once I had a device tree created and stored in memory, I needed to pass it to the kernel as part of boot_args:
typedef struct boot_args {
    u16	Revision;	                /* Revision of boot_args structure */
    u16	Version;	                /* Version of boot_args structure */
    char CommandLine[256];	        /* Passed in command line */
    DRAMBank PhysicalDRAM[26];	    /* base and range pairs for the 26 DRAM banks */
    Boot_Video Video;		        /* Video Information */
    u32	machineType;	            /* Machine Type (gestalt) */
    void *deviceTreeP;	            /* Base of flattened device tree */
    u32	deviceTreeLength;           /* Length of flattened tree */
    u32	topOfKernelData;            /* Highest address used in kernel data area */
} boot_args_t;
With the device tree in memory, I had made it past the device_tree.c crash. The bootloader was performing the basics well: loading the kernel, creating boot arguments and a device tree, and ultimately, calling the kernel. To make additional progress, I’d need to shift my attention toward patching the kernel source code to fix remaining compatibility issues.
Patching the Kernel
At this point, the kernel was getting stuck while running some code to set up video and I/O memory. XNU from this era makes assumptions about where video and I/O memory can be, and reconfigures Block Address Translations (BATs) in a way that doesn’t play nicely with the Wii’s memory layout (MEM1 starting at 0x00000000, MEM2 starting at 0x10000000). To work around these limitations, it was time to modify the kernel’s source code and boot a modified kernel binary.
Figuring out a sane development environment to build an OS kernel from 25 years ago took some effort. Here’s what I landed on:
- Mac OS X Cheetah guest (running via QEMU), headless, on a modern macOS host
- XNU source code lives on the host’s filesystem, and is exposed via an NFS server
- The guest accesses the XNU source via an NFS mount
- The host uses SSH to control the guest
- Edit XNU source on host, kick off a build via SSH on the guest, build artifacts end up on the filesystem accessible by host and guest
To set up the dependencies needed to build the Mac OS X Cheetah kernel on the Mac OS X Cheetah guest, I followed the instructions here. They mostly matched up with what I needed to do. Relevant sources are available from Apple here.
After fixing the BAT setup and adding some small patches to reroute console output to my USB Gecko, I now had video output and serial debug logs working - making future development and debugging significantly easier. Thanks to this new visibility into what was going on, I could see that the virtual memory, IOKit, and BSD subsystems were all initialized and running - without crashing. This was a significant milestone, and gave me confidence that I was on the right path to getting a full system working.
Readers who have attempted to run Mac OS X on a PC via “hackintoshing” may recognize the last line in the boot logs: the dreaded “Still waiting for root device”. This occurs when the system can’t find a root filesystem from which to continue booting. In my case, this was expected: the kernel had done all it could and was ready to load the rest of the Mac OS X system from the filesystem, but it didn’t know where to locate this filesystem. To make progress, I would need to tell the kernel how to read from the Wii’s SD card. To do this, I’d need to tackle the next phase of this project: writing drivers.
Writing Drivers
Understanding the IOKit Driver Model
Mac OS X drivers are built using IOKit - a collection of software components that aim to make it easy to extend the kernel to support different hardware devices. Drivers are written using a subset of C++, and make extensive use of object-oriented programming concepts like inheritance and composition. Many pieces of useful functionality are provided, including:
- Base classes and “families” that implement common behavior for different types of hardware
- A layered runtime architecture representing provider-client relationships
- Probing and matching drivers to hardware present in the device tree
- Abstractions for accessing device memory
In IOKit, there are two kinds of drivers: a specific device driver and a nub. A specific device driver is an object that manages a specific piece of hardware. A nub is an object that serves as an attach-point for a specific device driver, and also provides the ability for that attached driver to communicate with the driver that created the nub. It’s this chain of driver-to-nub-to-driver that creates the aforementioned provider-client relationships. I struggled for a while to grasp this concept, and found a concrete example useful.
Real Macs can have a PCI bus with several PCI ports. In this example, consider an ethernet card being plugged into one of the PCI ports. A driver, IOPCIBridge, handles communicating with the PCI bus hardware on the motherboard. This driver scans the bus, creating IOPCIDevice nubs (attach-points) for each plugged-in device that it finds. A hypothetical driver for the plugged-in ethernet card (let’s call it SomeEthernetCard) can attach to the nub, using it as its proxy to call into PCI functionality provided by the IOPCIBridge driver on the other side. The SomeEthernetCard driver can also create its own IOEthernetInterface nubs so that higher-level parts of the IOKit networking stack can attach to it.
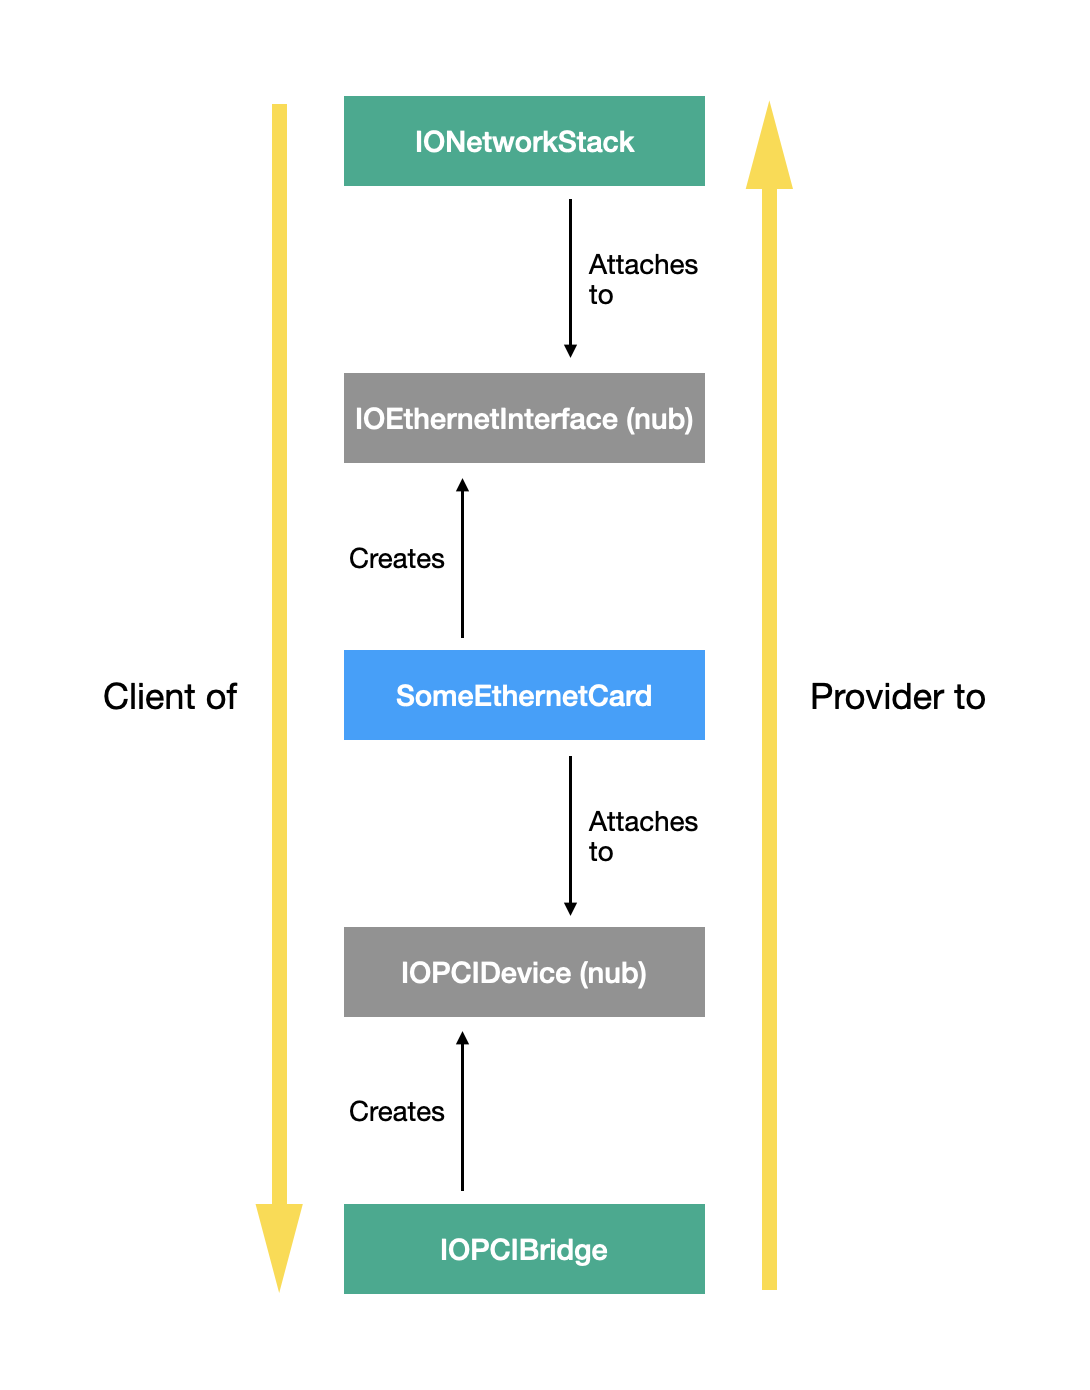
Someone developing a PCI ethernet card driver would only need to write SomeEthernetCard; the lower-level PCI bus communication and the higher-level networking stack code is all provided by existing IOKit driver families. As long as SomeEthernetCard can attach to an IOPCIDevice nub and publish its own IOEthernetInterface nubs, it can sandwich itself between two existing families in the driver stack, benefiting from all of the functionality provided by IOPCIFamily while also satisfying the needs of IONetworkingFamily.
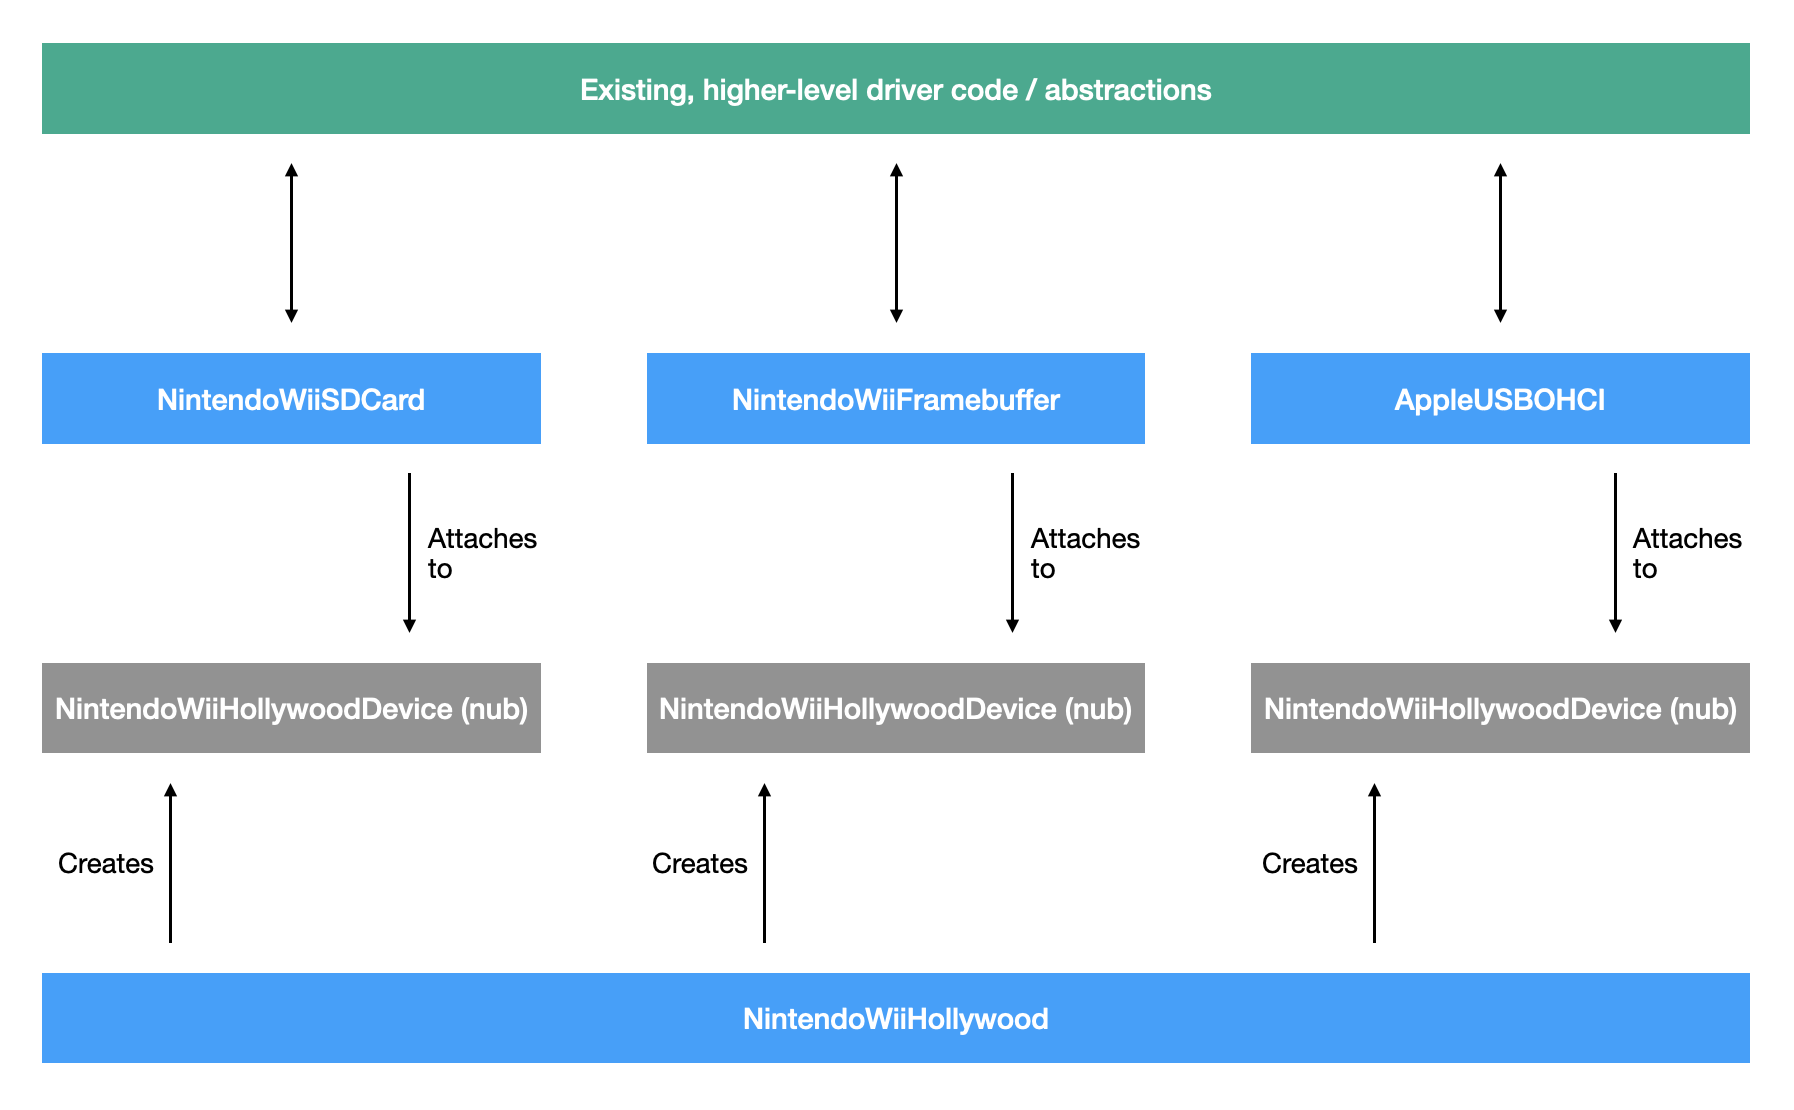
Representing the Wii’s Hardware
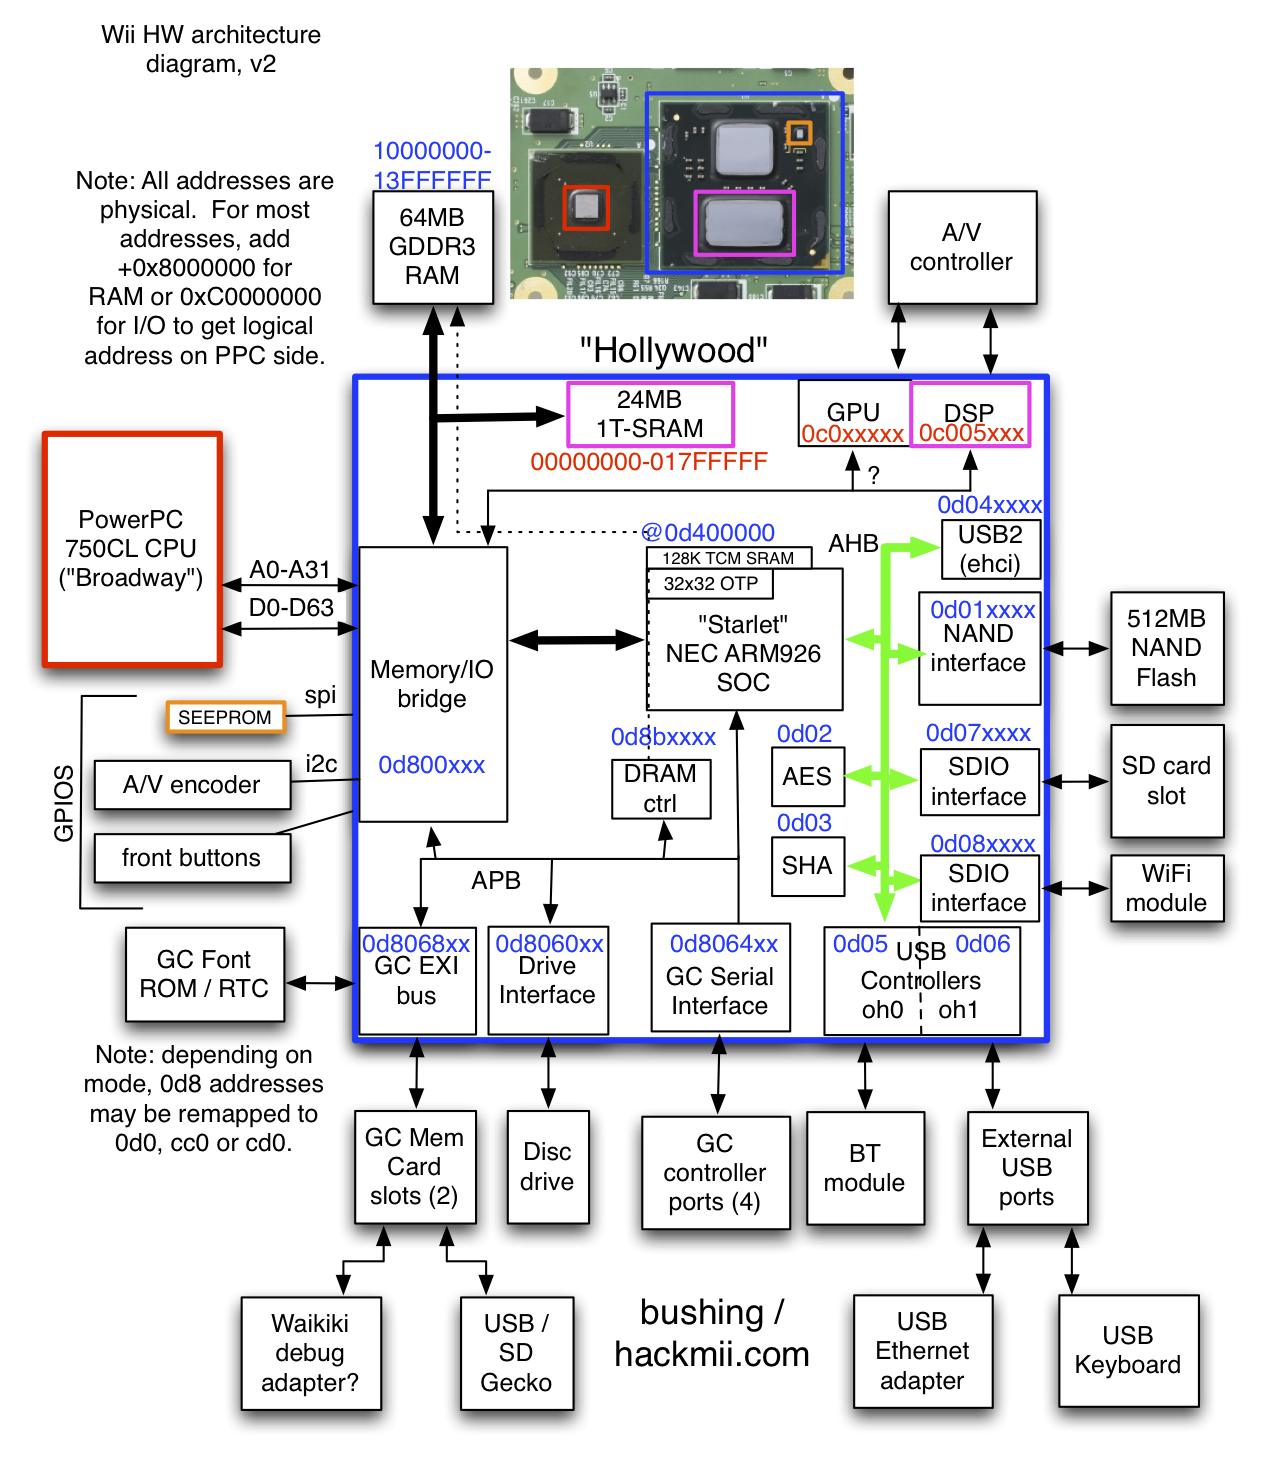
Unlike Macs from the same era, the Wii doesn’t use PCI to connect its various pieces of hardware to its motherboard. Instead, it uses a custom system-on-a-chip (SoC) called the Hollywood. Through the Hollywood, many pieces of hardware can be accessed: the GPU, SD card, WiFi, Bluetooth, interrupt controllers, USB ports, and more. The Hollywood also contains an ARM coprocessor, nicknamed the Starlet, that exposes hardware functionality to the main PowerPC processor via inter-processor-communication (IPC).
 Source: WiiBrew: Hardware
This unique hardware layout and communication protocol meant that I couldn’t piggy-back off of an existing IOKit driver family like IOPCIFamily. Instead, I would need to implement an equivalent driver for the Hollywood SoC, creating nubs that represent attach-points for all of the hardware it contains. I landed on this layout of drivers and nubs (note that this is only showing a subset of the drivers that had to be written):
Now that I had a better idea of how to represent the Wii’s hardware in IOKit, I began work on my Hollywood driver.
Writing a Hollywood Driver
I started by creating a new C++ header and implementation file for a NintendoWiiHollywood driver. Its driver “personality” enabled it to be matched to a node in the device tree with the name “hollywood”`. Once the driver was matched and running, it was time to publish nubs for all of its child devices.
Once again leaning on the device tree as the source of truth for what hardware lives under the Hollywood, I iterated through all of the Hollywood node’s children, creating and publishing NintendoWiiHollywoodDevice nubs for each:
bool NintendoWiiHollywood::publishBelow(OSIterator *iter)
{
  IORegistryEntry *next;
  IOService *nub;

  if (!iter)
  {
    return false;
  }

  // loop through all children of /hollywood
  while ((next = (IORegistryEntry *)iter->getNextObject()))
  {
    // create a nub
    nub = createNub(next);
    if (!nub)
    {
      continue;
    }

    // publish nubs so that drivers can attach to them
    if (nub->attach(this))
    {
      nub->registerService();
    }

    nub->release();
  }

  iter->release();

  return true;
}

IOService *NintendoWiiHollywood::createNub(IORegistryEntry *from)
{
  NintendoWiiHollywoodDevice *nub = new NintendoWiiHollywoodDevice;

  if (nub && nub->init(from, gIODTPlane))
  {
    // give the nub a reference back to its hollywood "provider"
    nub->hollywood = this;
    return nub;
  }

  if (nub)
  {
    nub->release();
  }

  return 0;
}
Once NintendoWiiHollywoodDevice nubs were created and published, the system would be able to have other device drivers, like an SD card driver, attach to them.
Writing an SD Card Driver
Next, I moved on to writing a driver to enable the system to read and write from the Wii’s SD card. This driver is what would enable the system to continue booting, since it was currently stuck looking for a root filesystem from which to load additional startup files.
I began by subclassing IOBlockStorageDevice, which has many abstract methods intended to be implemented by subclassers:
virtual IOReturn doAsyncReadWrite(IOMemoryDescriptor *buffer, UInt32 block, UInt32 nblks, IOStorageCompletion completion) = 0;
virtual IOReturn doSyncReadWrite(IOMemoryDescriptor *buffer, UInt32 block, UInt32 nblks) = 0;
virtual IOReturn doEjectMedia(void) = 0;
virtual IOReturn doFormatMedia(UInt64 byteCapacity) = 0;
virtual UInt32 doGetFormatCapacities(UInt64 *capacities, UInt32 capacitiesMaxCount) const = 0;
virtual IOReturn doLockUnlockMedia(bool doLock) = 0;
virtual IOReturn doSynchronizeCache(void) = 0;
virtual char *getVendorString(void) = 0;
virtual char *getProductString(void) = 0;
virtual char *getRevisionString(void) = 0;
virtual char *getAdditionalDeviceInfoString(void) = 0;
virtual IOReturn reportBlockSize(UInt64 *blockSize) = 0;
virtual IOReturn reportEjectability(bool *isEjectable) = 0;
virtual IOReturn reportLockability(bool *isLockable) = 0;
virtual IOReturn reportMaxReadTransfer(UInt64 blockSize, UInt64 *max) = 0;
virtual IOReturn reportMaxWriteTransfer(UInt64 blockSize, UInt64 *max) = 0;
virtual IOReturn reportMaxValidBlock(UInt64 *maxBlock) = 0;
virtual IOReturn reportMediaState(bool *mediaPresent, bool *changedState) = 0;
virtual IOReturn reportPollRequirements(bool *pollRequired, bool *pollIsExpensive) = 0;
virtual IOReturn reportRemovability(bool *isRemovable) = 0;
virtual IOReturn reportWriteProtection(bool *isWriteProtected) = 0;
For most of these methods, I could implement them with hard-coded values that matched the Wii’s SD card hardware; vendor string, block size, max read and write transfer size, ejectability, and many others all return constant values, and were trivial to implement.
The more interesting methods to implement were the ones that needed to actually communicate with the currently-inserted SD card: getting the capacity of the SD card, reading from the SD card, and writing to the SD card:
virtual IOReturn doAsyncReadWrite(IOMemoryDescriptor *buffer, UInt32 block, UInt32 nblks, IOStorageCompletion completion) = 0;
virtual IOReturn doSyncReadWrite(IOMemoryDescriptor *buffer, UInt32 block, UInt32 nblks) = 0;
virtual IOReturn reportMaxValidBlock(UInt64 *maxBlock) = 0;
To communicate with the SD card, I utilized the IPC functionality provided by MINI running on the Starlet co-processor. By writing data to certain reserved memory addresses, the SD card driver was able to issue commands to MINI. MINI would then execute those commands, communicating back any result data by writing to a different reserved memory address that the driver could monitor.
MINI supports many useful command types. The ones used by the SD card driver are:
IPC_SDMMC_SIZE: Returns the number of sectors on the currently-inserted SD cardIPC_SDMMC_READ: Reads data from a sector into a memory bufferIPC_SDMMC_WRITE: Writes data from a memory buffer to a sector
With these three command types, reads, writes, and capacity-checks could all be implemented, enabling me to satisfy the core requirements of the block storage device subclass.
Like with most programming endevours, things rarely work on the first try. To investigate issues, my primary debugging tool was sending log messages to the serial debugger via calls to IOLog. With this technique, I was able to see which methods were being called on my driver, what values were being passed in, and what values my IPC implementation was sending to and receiving from MINI - but I had no ability to set breakpoints or analyze execution dynamically while the kernel was running.
One of the trickier bugs that I encountered had to do with cached memory. When the SD card driver wants to read from the SD card, the command it issues to MINI (running on the ARM CPU) includes a memory address at which to store any loaded data. After MINI finishes writing to memory, the SD card driver (running on the PowerPC CPU) might not be able to see the updated contents if that region is mapped as cacheable. In that case, the PowerPC will read from its cache lines rather than RAM, returning stale data instead of the newly loaded contents. To work around this, the SD card driver must use uncached memory for its buffers.
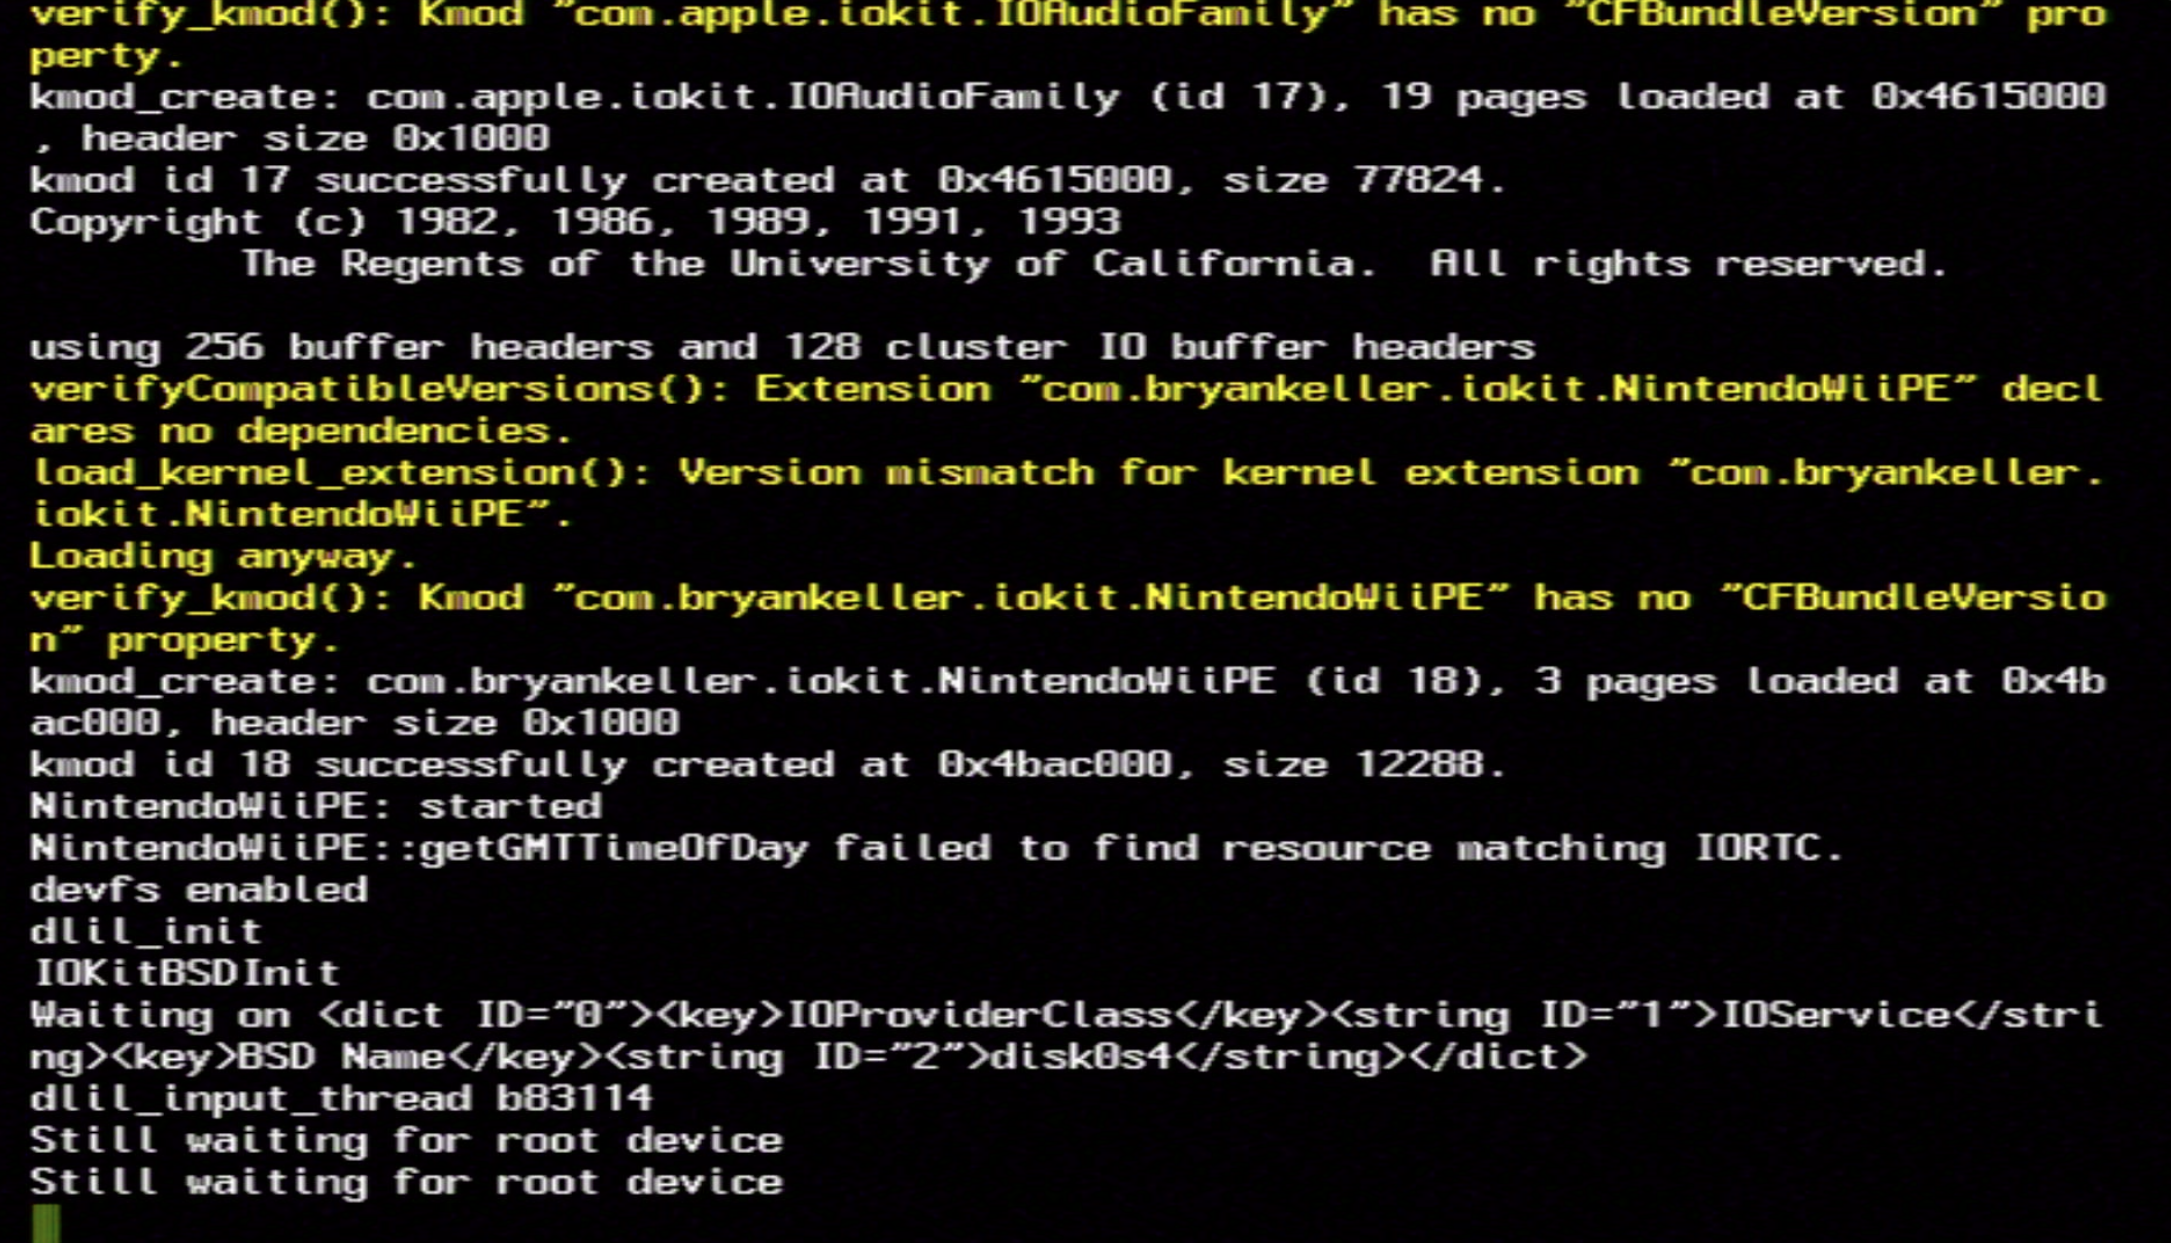
After several days of bug-fixing, I reached a new milestone: IOBlockStorageDriver, which attached to my SD card driver, had started publishing IOMedia nubs representing the logical partitions present on the SD. Through these nubs, higher-level parts of the system were able to attach and begin using the SD card. Importantly, the system was now able to find a root filesystem from which to continue booting, and I was no longer stuck at “Still waiting for root device”:
My boot logs now looked like this:
Waiting on <dict ID="0"><key>IOProviderClass</key><string ID="1">IOService</string><key>BSD Name</key><string ID="2">disk0s4</string></dict>
NintendoWiiSDCard: started
Got boot device = IOService:/NintendoWiiPE/hollywood/NintendoWiiHollywood/sdhc@D070000/NintendoWiiSDCard/IOBlockStorageDriver/Nintendo Nintendo Wii SD Media/IOApplePartitionScheme/Untitled 4@4
BSD root: disk0s4, major 14, minor 3
devfs on /dev
After some more rounds of bug fixes (while on the go), I was able to boot past single-user mode:
And eventually, make it through the entire verbose-mode startup sequence, which ends with the message: “Startup complete”:
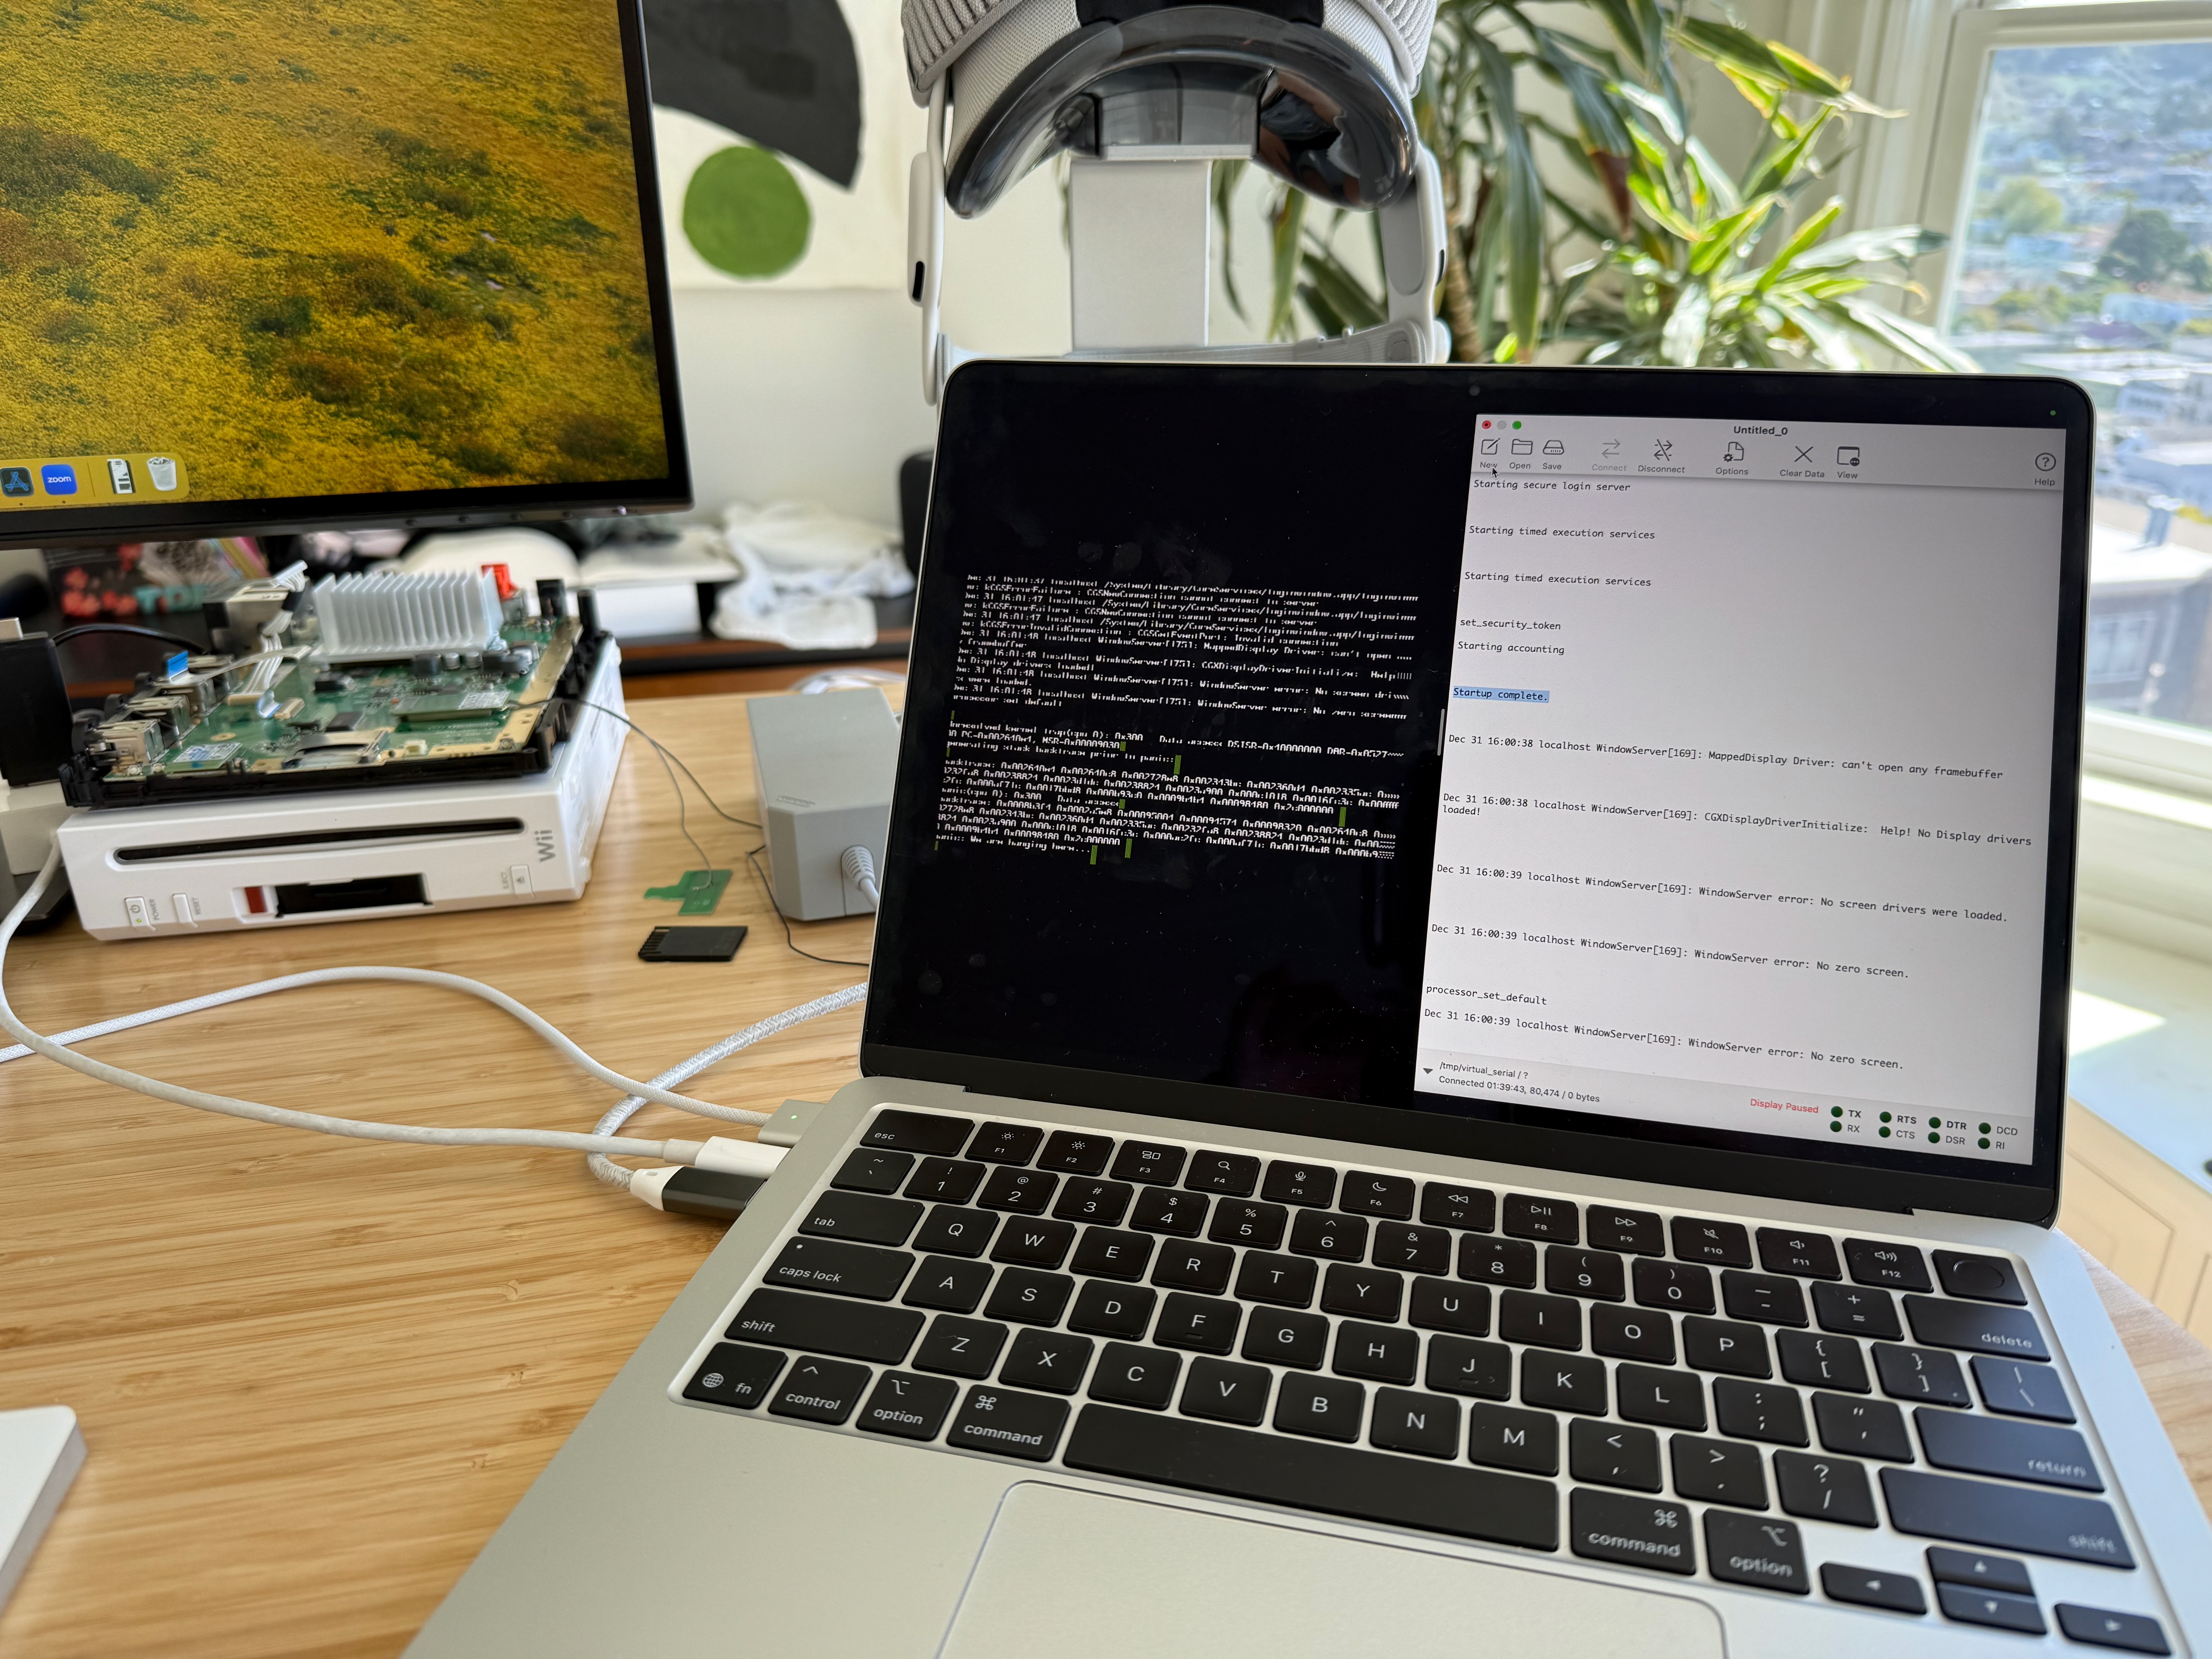
At this point, the system was trying to find a framebuffer driver so that the Mac OS X GUI could be shown. As indicated in the logs, WindowServer was not happy - to fix this, I’d need to write my own framebuffer driver.
Writing a Framebuffer Driver
A framebuffer is a region of RAM that stores the pixel data used to produce an image on a display. This data is typically made up of color component values for each pixel. To change what’s displayed, new pixel data is written into the framebuffer, which is then shown the next time the display refreshes. For the Wii, the framebuffer usually lives somewhere in MEM1 due to it being slightly faster than MEM2. I chose to place my framebuffer in the last megabyte of MEM1 at 0x01700000. At 640x480 resolution, and 16 bits per pixel, the pixel data for the framebuffer fit comfortably in less than one megabyte of memory.
Early in the boot process, Mac OS X uses the bootloader-provided framebuffer address to display simple boot graphics via video_console.c. In the case of a verbose-mode boot, font-character bitmaps are written into the framebuffer to produce a visual log of what’s happening while starting up. Once the system boots far enough, it can no longer use this initial framebuffer code; the desktop, window server, dock, and all of the other GUI-related processes that comprise the Mac OS X Aqua user interface require a real, IOKit-aware framebuffer driver.
To tackle this next driver, I subclassed IOFramebuffer. Similar to subclassing IOBlockStorageDevice for the SD card driver, IOFramebuffer also had several abstract methods for my framebuffer subclass to implement:
virtual class IODeviceMemory* getApertureRange(IOPixelAperture aperture);
virtual const char* getPixelFormats();
virtual IOItemCount getDisplayModeCount();
virtual IOReturn getDisplayModes(IODisplayModeID *);
virtual IOReturn getInformationForDisplayMode(long int, IODisplayModeInformation *);
virtual UInt64 getPixelFormatsForDisplayMode(long int, long int);
virtual IOReturn getPixelInformation(long int, long int, long int, IOPixelInformation *);
virtual IOReturn getCurrentDisplayMode(IODisplayModeID *, IOIndex *);
virtual IOReturn setGammaTable(UInt32, UInt32, UInt32, void *);
virtual IOReturn setDisplayMode(IODisplayModeID, IOIndex);
virtual IOReturn setApertureEnable(IOPixelAperture, IOOptionBits);
virtual IOReturn newUserClient(task_t, void *, UInt32, IOUserClient **);
virtual bool isConsoleDevice(void);
Once again, most of these were trivial to implement, and simply required returning hard-coded Wii-compatible values that accurately described the hardware. One of the most important methods to implement is getApertureRange, which returns an IODeviceMemory instance whose base address and size describe the location of the framebuffer in memory:
IODeviceMemory* NintendoWiiFramebuffer::getApertureRange(IOPixelAperture aperature)
{
  // 0x01700000, 640x480 resoluton, 2 bytes (16 bits) per pixel
  return IODeviceMemory::withRange(0x01700000, 640 * 480 * 2);
}
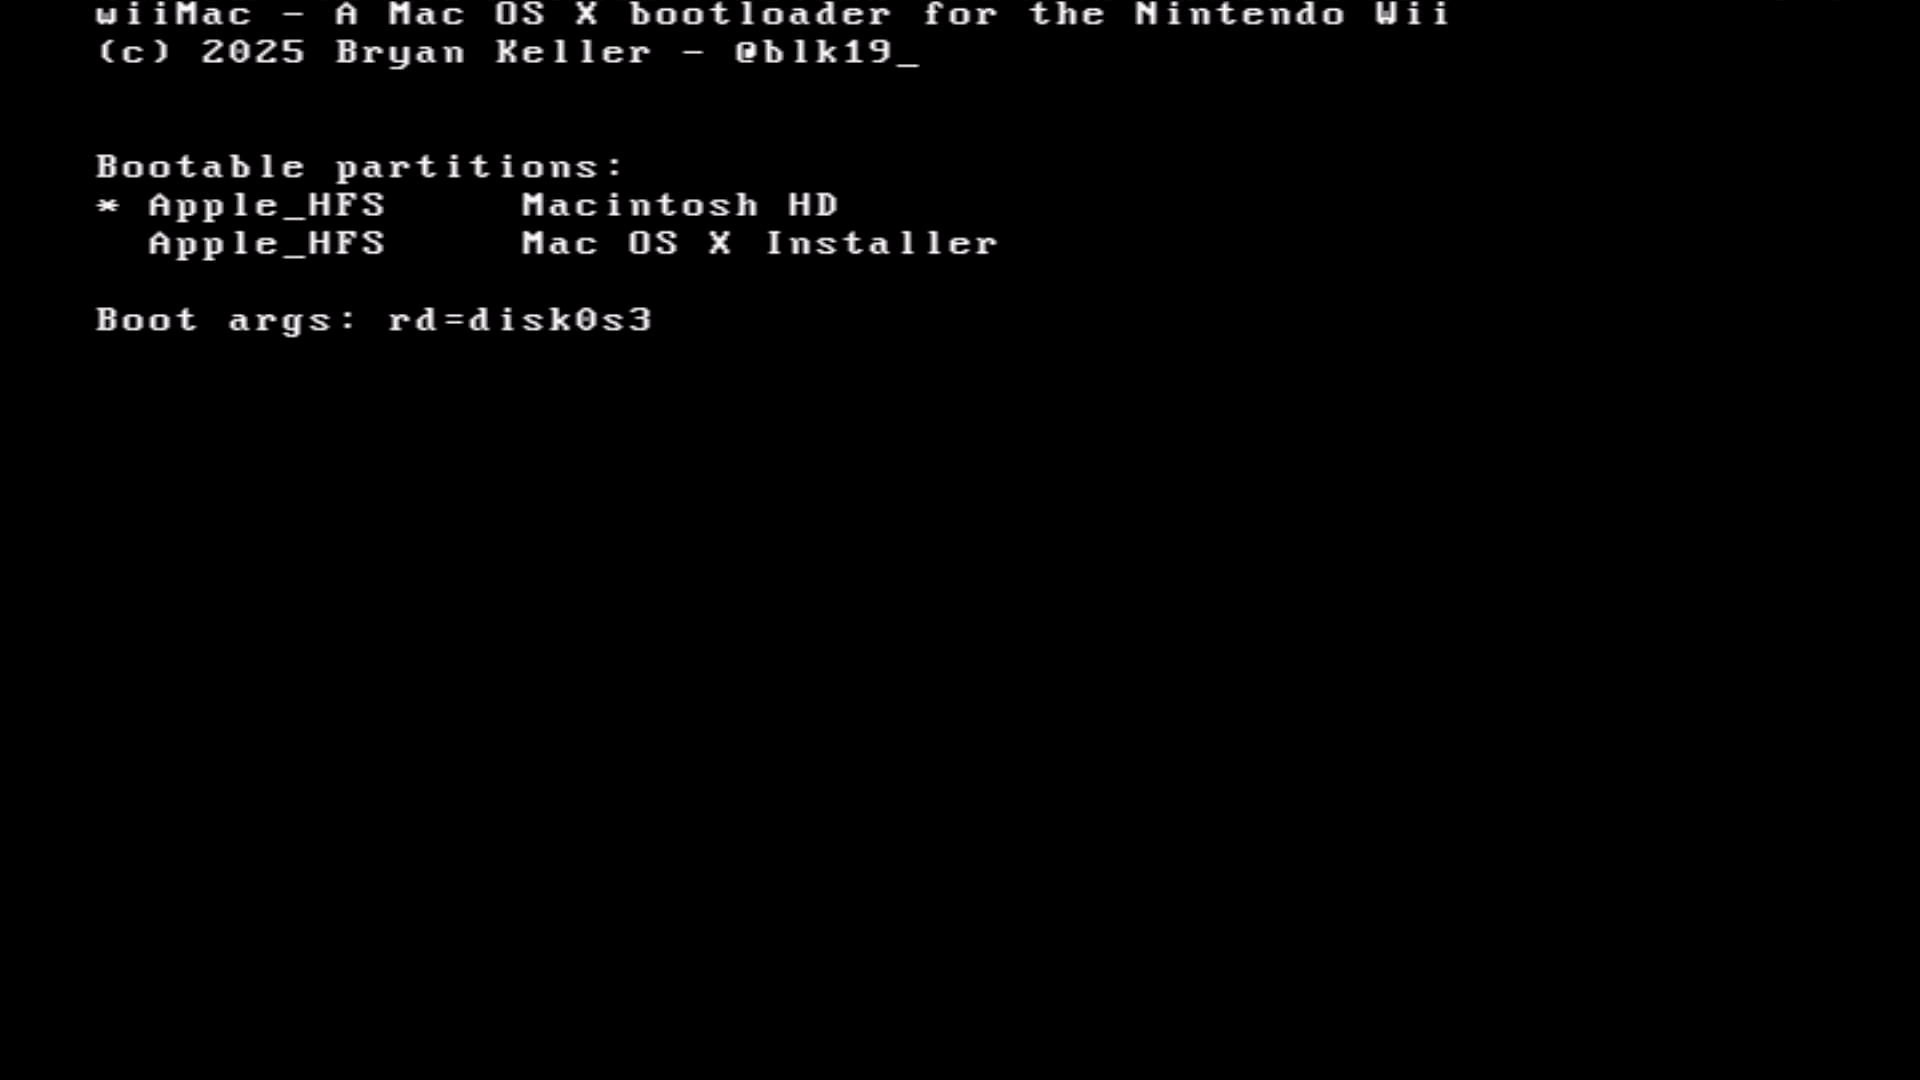
After returning the correct device memory instance from this method, the system was able to transition from the early-boot text-output framebuffer, to a framebuffer capable of displaying the full Mac OS X GUI. I was even able to boot the Mac OS X installer:

Readers with a keen eye might notice some issues:
- The verbose-mode text framebuffer is still active, causing text to be displayed and the framebuffer to be scrolled
- Everything is magenta
The fix for the early-boot video console still writing text output to the framebuffer was simple: tell the system that our new, IOKit framebuffer is the same as the one that was previously in use by returning true from isConsoleDevice:
bool NintendoWiiFramebuffer::isConsoleDevice(void)
{
  return true;
}
The fix for the incorrect colors was much more involved, as it relates to a fundamental incompatibility between the Wii’s video hardware and the graphics code that Mac OS X uses.
The Nintendo Wii’s video encoder hardware is optimized for analogue TV signal output, and as a result, expects 16-bit YUV pixel data in its framebuffer. This is a problem, since Mac OS X expects the framebuffer to contain RGB pixel data. If the framebuffer that the Wii displays contains non-YUV pixel data, then colors will be completely wrong.
To work around this incompatibility, I took inspiration from the Wii Linux project, which had solved this problem many years ago. The strategy is to use two framebuffers: an RGB framebuffer that Mac OS X interacts with, and a YUV framebuffer that the Wii’s video hardware outputs to the attached display. 60 times per second, the framebuffer driver converts the pixel data in the RGB framebuffer to YUV pixel data, placing the converted data in the framebuffer that the Wii’s video hardware displays:
After implementing the dual-framebuffer strategy, I was able to boot into a correctly-colored Mac OS X system - for the first time, Mac OS X was running on a Nintendo Wii:
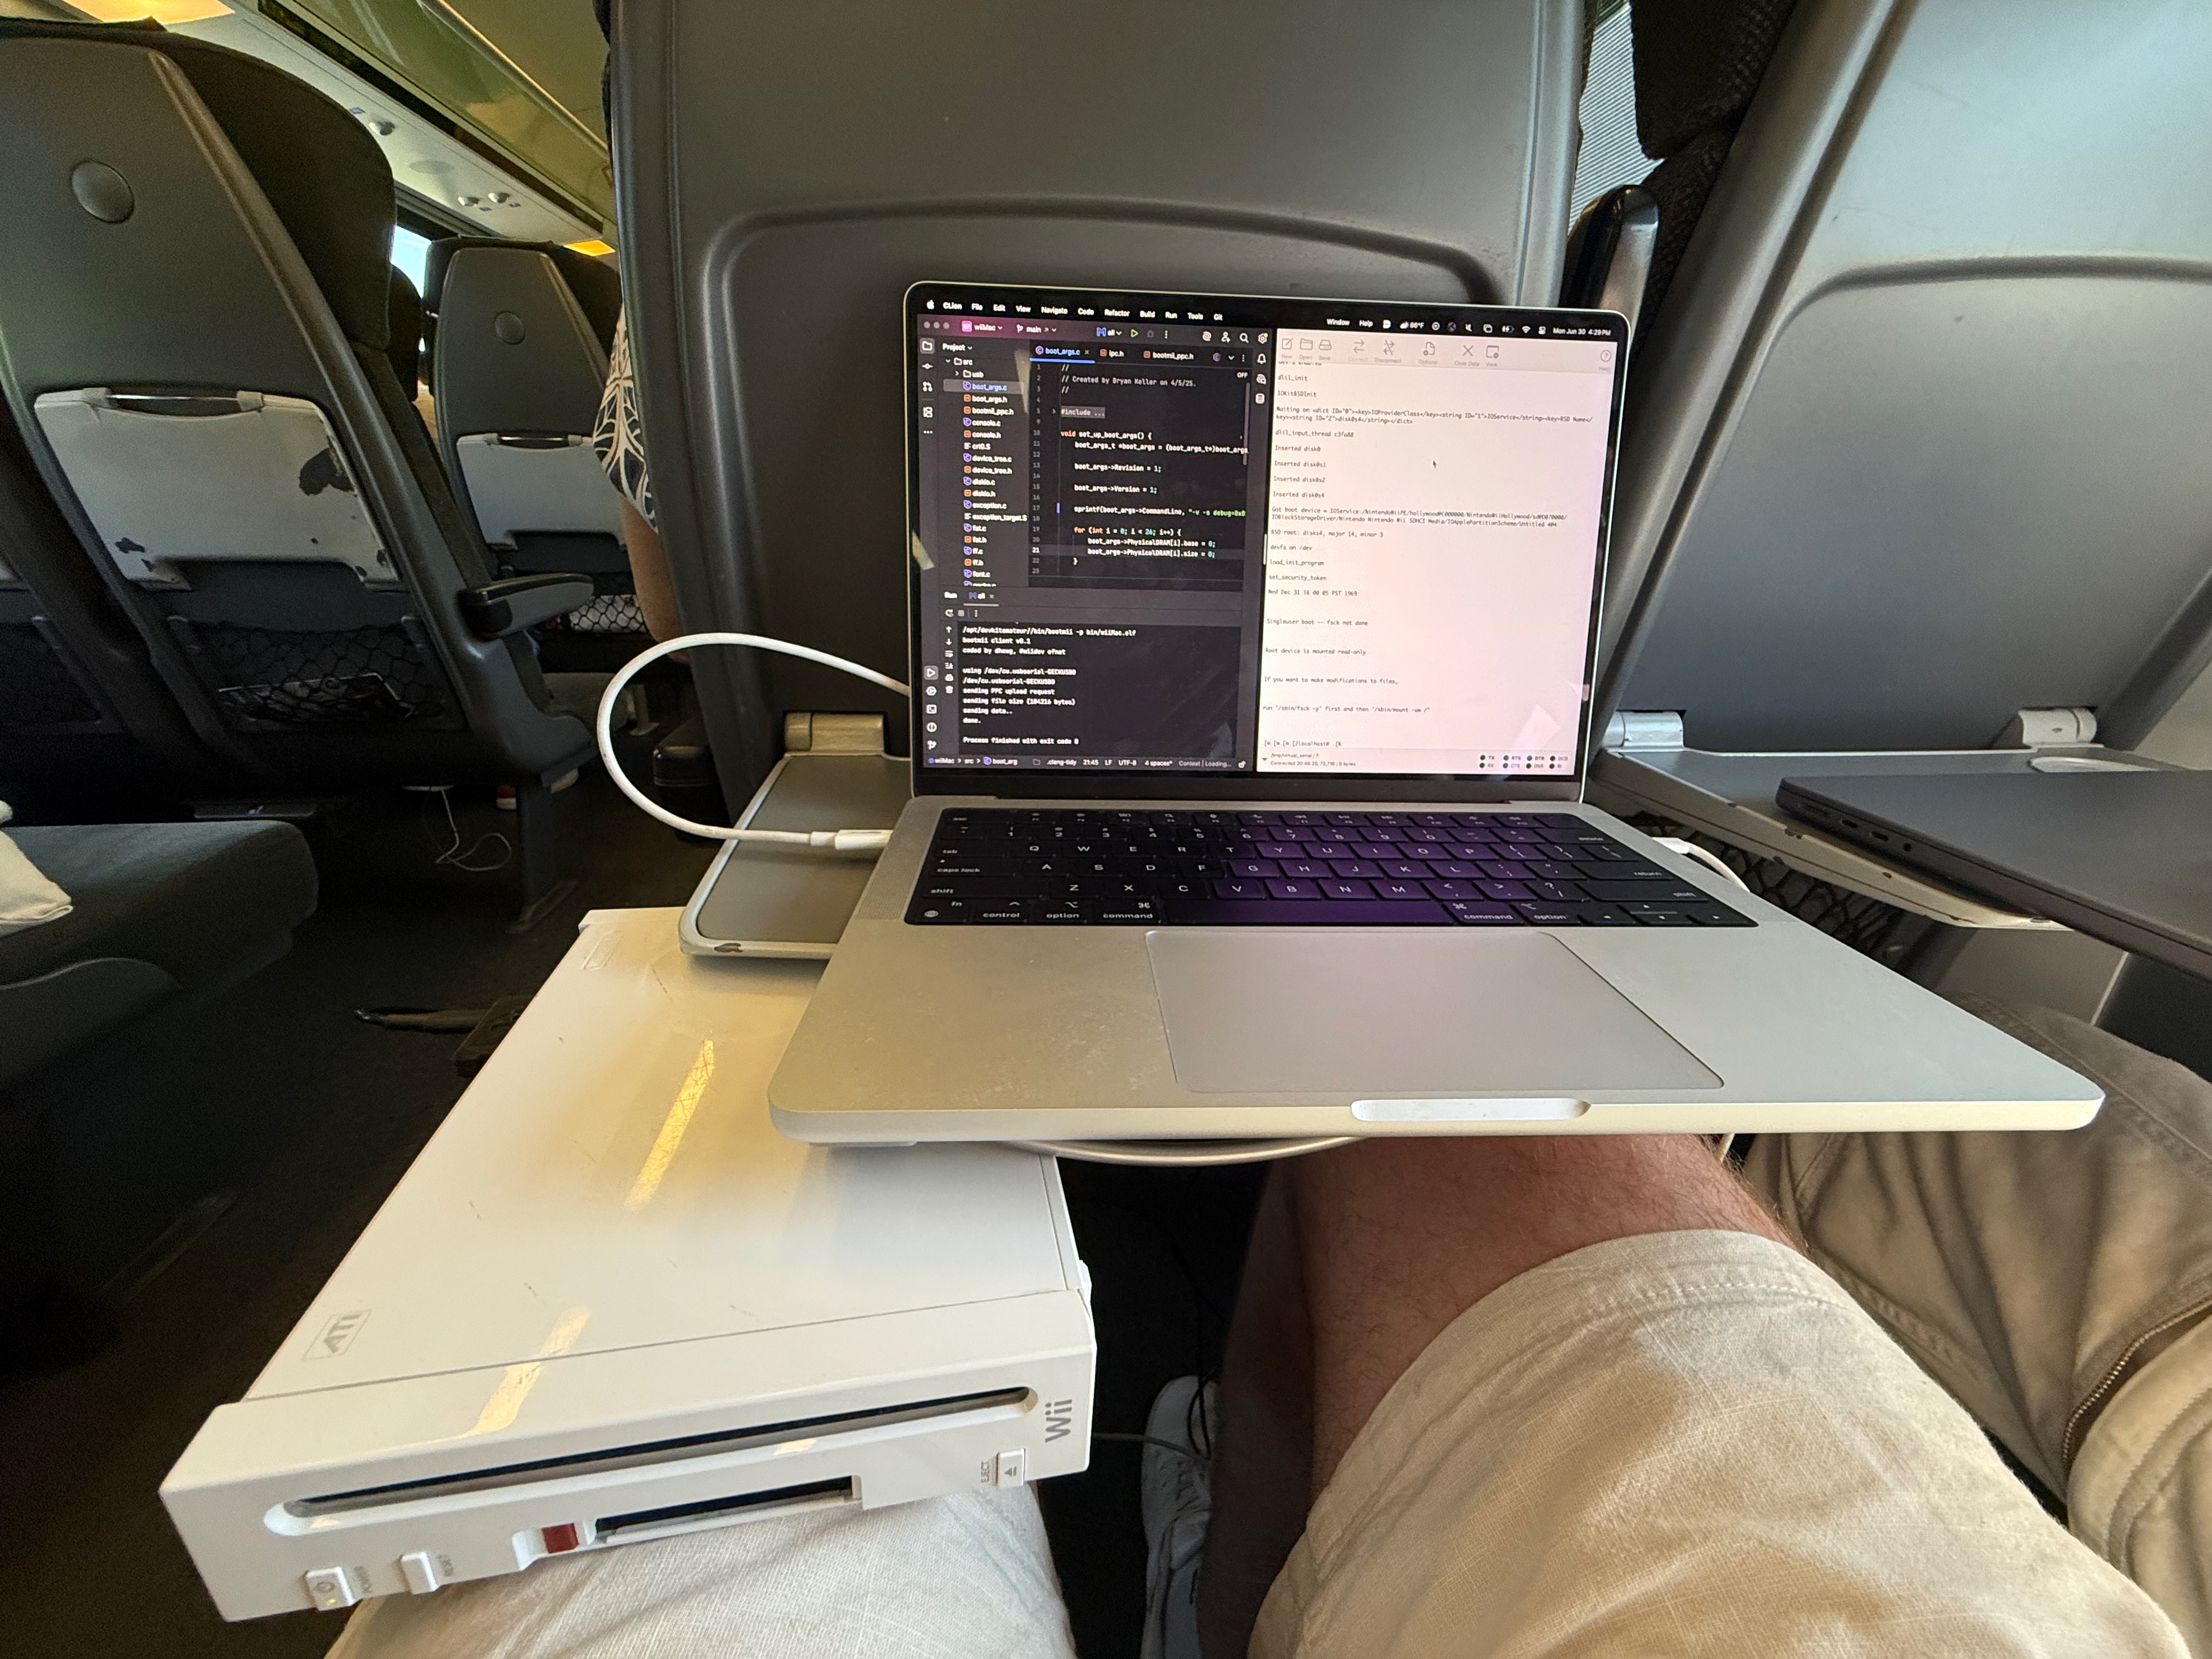
 (Yes, I brought the Wii on a trip to Hawaii - it’s hard to put a project down when you’re on the verge of reaching a major milestone!)
The system was now booted all the way to the desktop - but there was a problem - I had no way to interact with anything. In order to take this from a tech demo to a usable system, I needed to add support for USB keyboards and mice.
Adding USB Support
To enable USB keyboard and mouse input, I needed to get the Wii’s rear USB ports working under Mac OS X - specifically, I needed to get the low-speed, USB 1.1 OHCI host controller up and running. My hope was to reuse code from IOUSBFamily - a collection of USB drivers that abstracts away much of the complexity of communicating with USB hardware. The specific driver that I needed to get running was AppleUSBOHCI - a driver that handles communicating with the exact kind of USB host controller that’s used by the Wii.
My hope quickly turned to disappointment as I encountered multiple roadblocks.
Roadblock 1:
IOUSBFamily source code for Mac OS X Cheetah and Puma is, for some reason, not part of the otherwise comprehensive collection of open source releases provided by Apple. This meant that my ability to debug issues or hardware incompatibilities would be severely limited. Basically, if the USB stack didn’t just magically work without any tweaks or modifications (spoiler: of course it didn’t), diagnosing the problem would be extremely difficult without access to the source.
Roadblock 2:
AppleUSBOHCI didn’t match any hardware in the device tree, and therefore didn’t start running, due to its driver personality insisting that its provider class (the nub to which it attaches) be an IOPCIDevice. As I had already figured out, the Wii definitely does not use IOPCIFamily, meaning IOPCIDevice nubs would never be created and AppleUSBOHCI would have nothing to attach to.
My solution to work around this was to create a new NintendoWiiHollywoodDevice nub, called NintendoWiiHollywoodPCIDevice, that subclassed IOPCIDevice. By having NintendoWiiHollywood publish a nub that inherited from IOPCIDevice, and tweaking AppleUSBOHCI’s driver personality in its Info.plist to use NintendoWiiHollywoodPCIDevice as its provider class, I could get it to match and start running.
To figure out how AppleUSBOHCI was using its PCI device nub, I used a mix of runtime logging, disassembly analysis, and source-code analysis of Mac OS X 10.2 Jaguar’s IOUSBFamily sources (which are the first available from Apple). To my relief, communication with the PCI hardware via the PCI device nub was limited - the main thing AppleUSBOHCI needed from the PCI hardware was the base address of the USB host controller - something that it retrieved using PCI commands. I was able to intercept these commands in my fake PCI nub and return the base address of the Wii’s OHCI hardware.
With these workarounds, AppleUSBOHCI was now running - however, my USB ports still failed to respond.
Roadblock 3:
My next discovery was that AppleUSBOHCI assumes little-endian byte ordering for register reads and writes. After doing some research, I learned that this is actually pretty standard behavior for OHCI hardware, even if the host hardware is a big-endian system (as is the case for PowerPC systems like the Wii and PowerPC Macs). So why wasn’t this working on the Wii?
The incompatibility comes down to a difference in how IOUSBFamily and the Wii handle endianness differences between USB hardware and the host processor - in the case of IOUSBFamily, data is byte-swapped in software working with OHCI registers, while in the case of the Wii, data is byte-swapped in hardware via swapped byte lanes, making the OHCI registers automatically appear to be big-endian when read from or written to. This system on the Wii is known as reversed-little-endian.
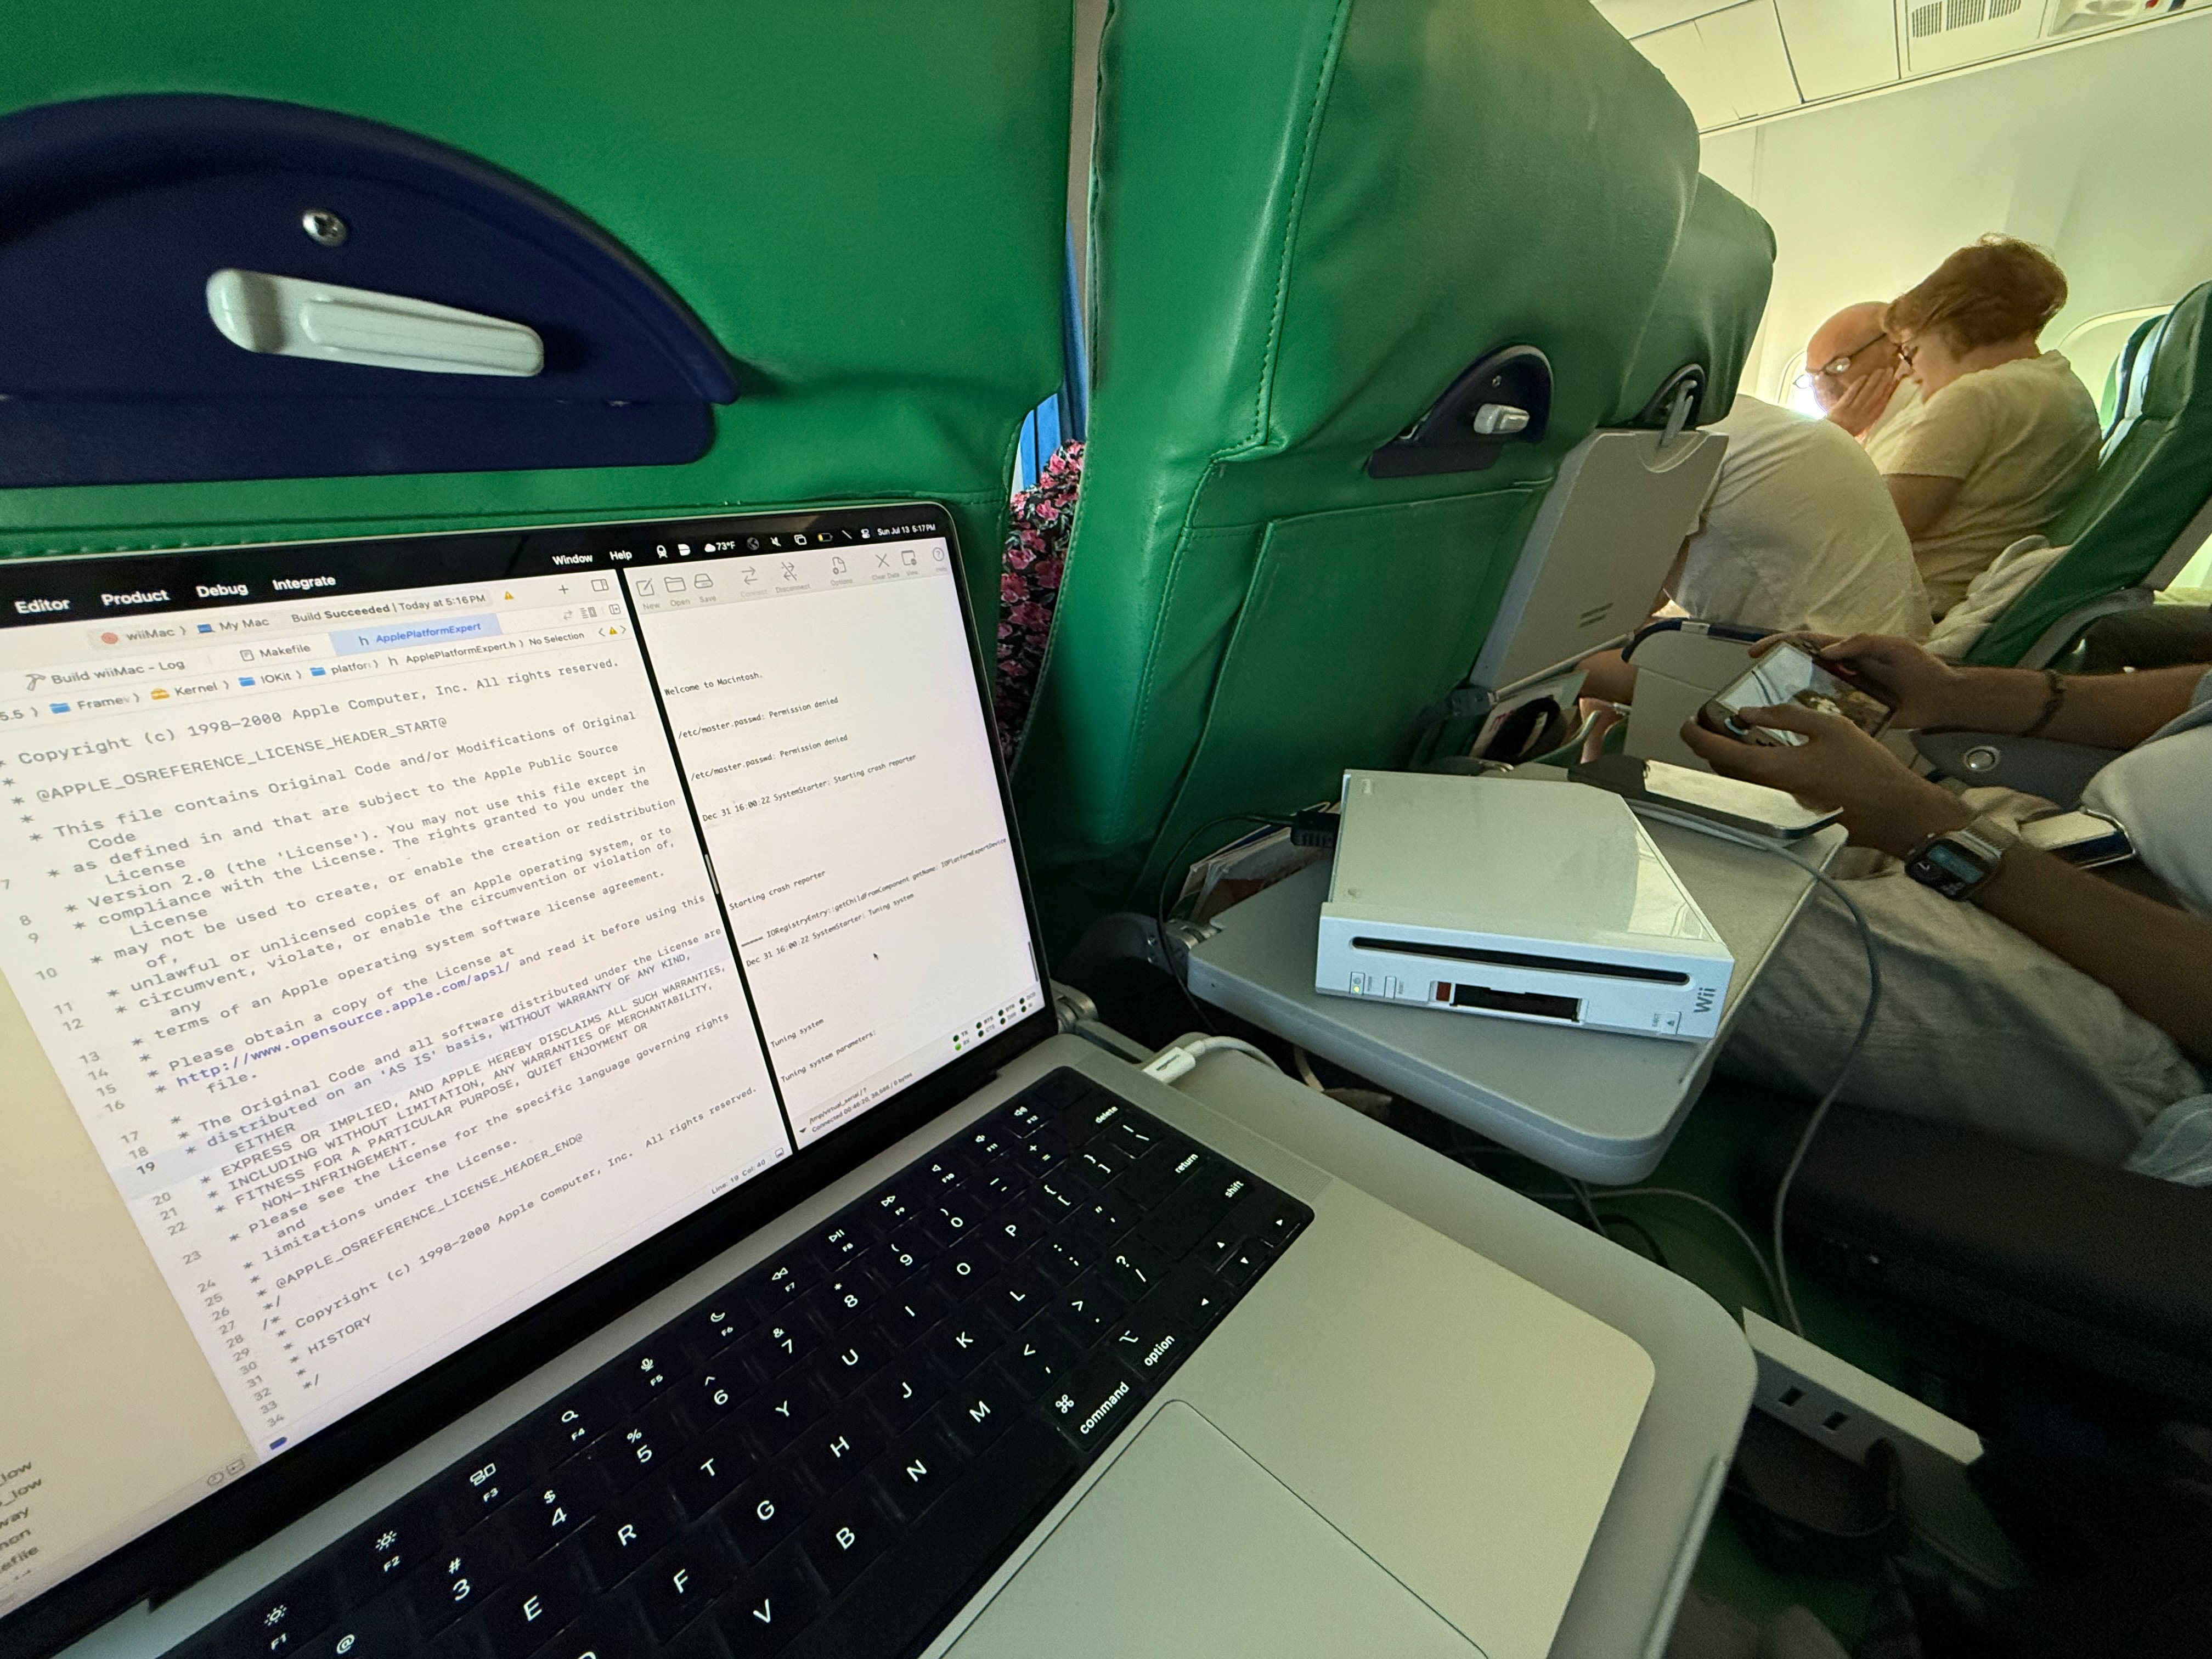
To work around this, I needed to prevent the “double swap” that was happening by removing the software byte-swapping that IOUSBFamily was performing - but without access to the source code, this wouldn’t be easy. Once again tackling a difficult problem while traveling, I spent several hours on a flight using Ghidra to find and patch-out any byte-swapping instructions. This quickly got messy, as there are several places in the USB stack that have legitimate byte-swapping use cases, and should not be patched out.
In the end, my hand-patched AppleUSBOHCI binary was fragile, nearly impossible to edit, and almost certainly incorrect. Unsurprisingly, it didn’t work, and my USB ports continued to be unresponsive.
Unblocked:
What I really needed was access to IOUSBFamily source code for Mac OS X Cheetah. If I had that, I could remove the dependency on IOPCIFamily, remove all of the unnecessary software byte-swaps, and hopefully build a working fork that works for the Wii’s hardware.
After spending several days searching old forums, browsing sites on the Wayback Machine, and attempting to access ancient FTP servers, I decided to return to one of the original places that I used to ask for help on the internet: IRC.
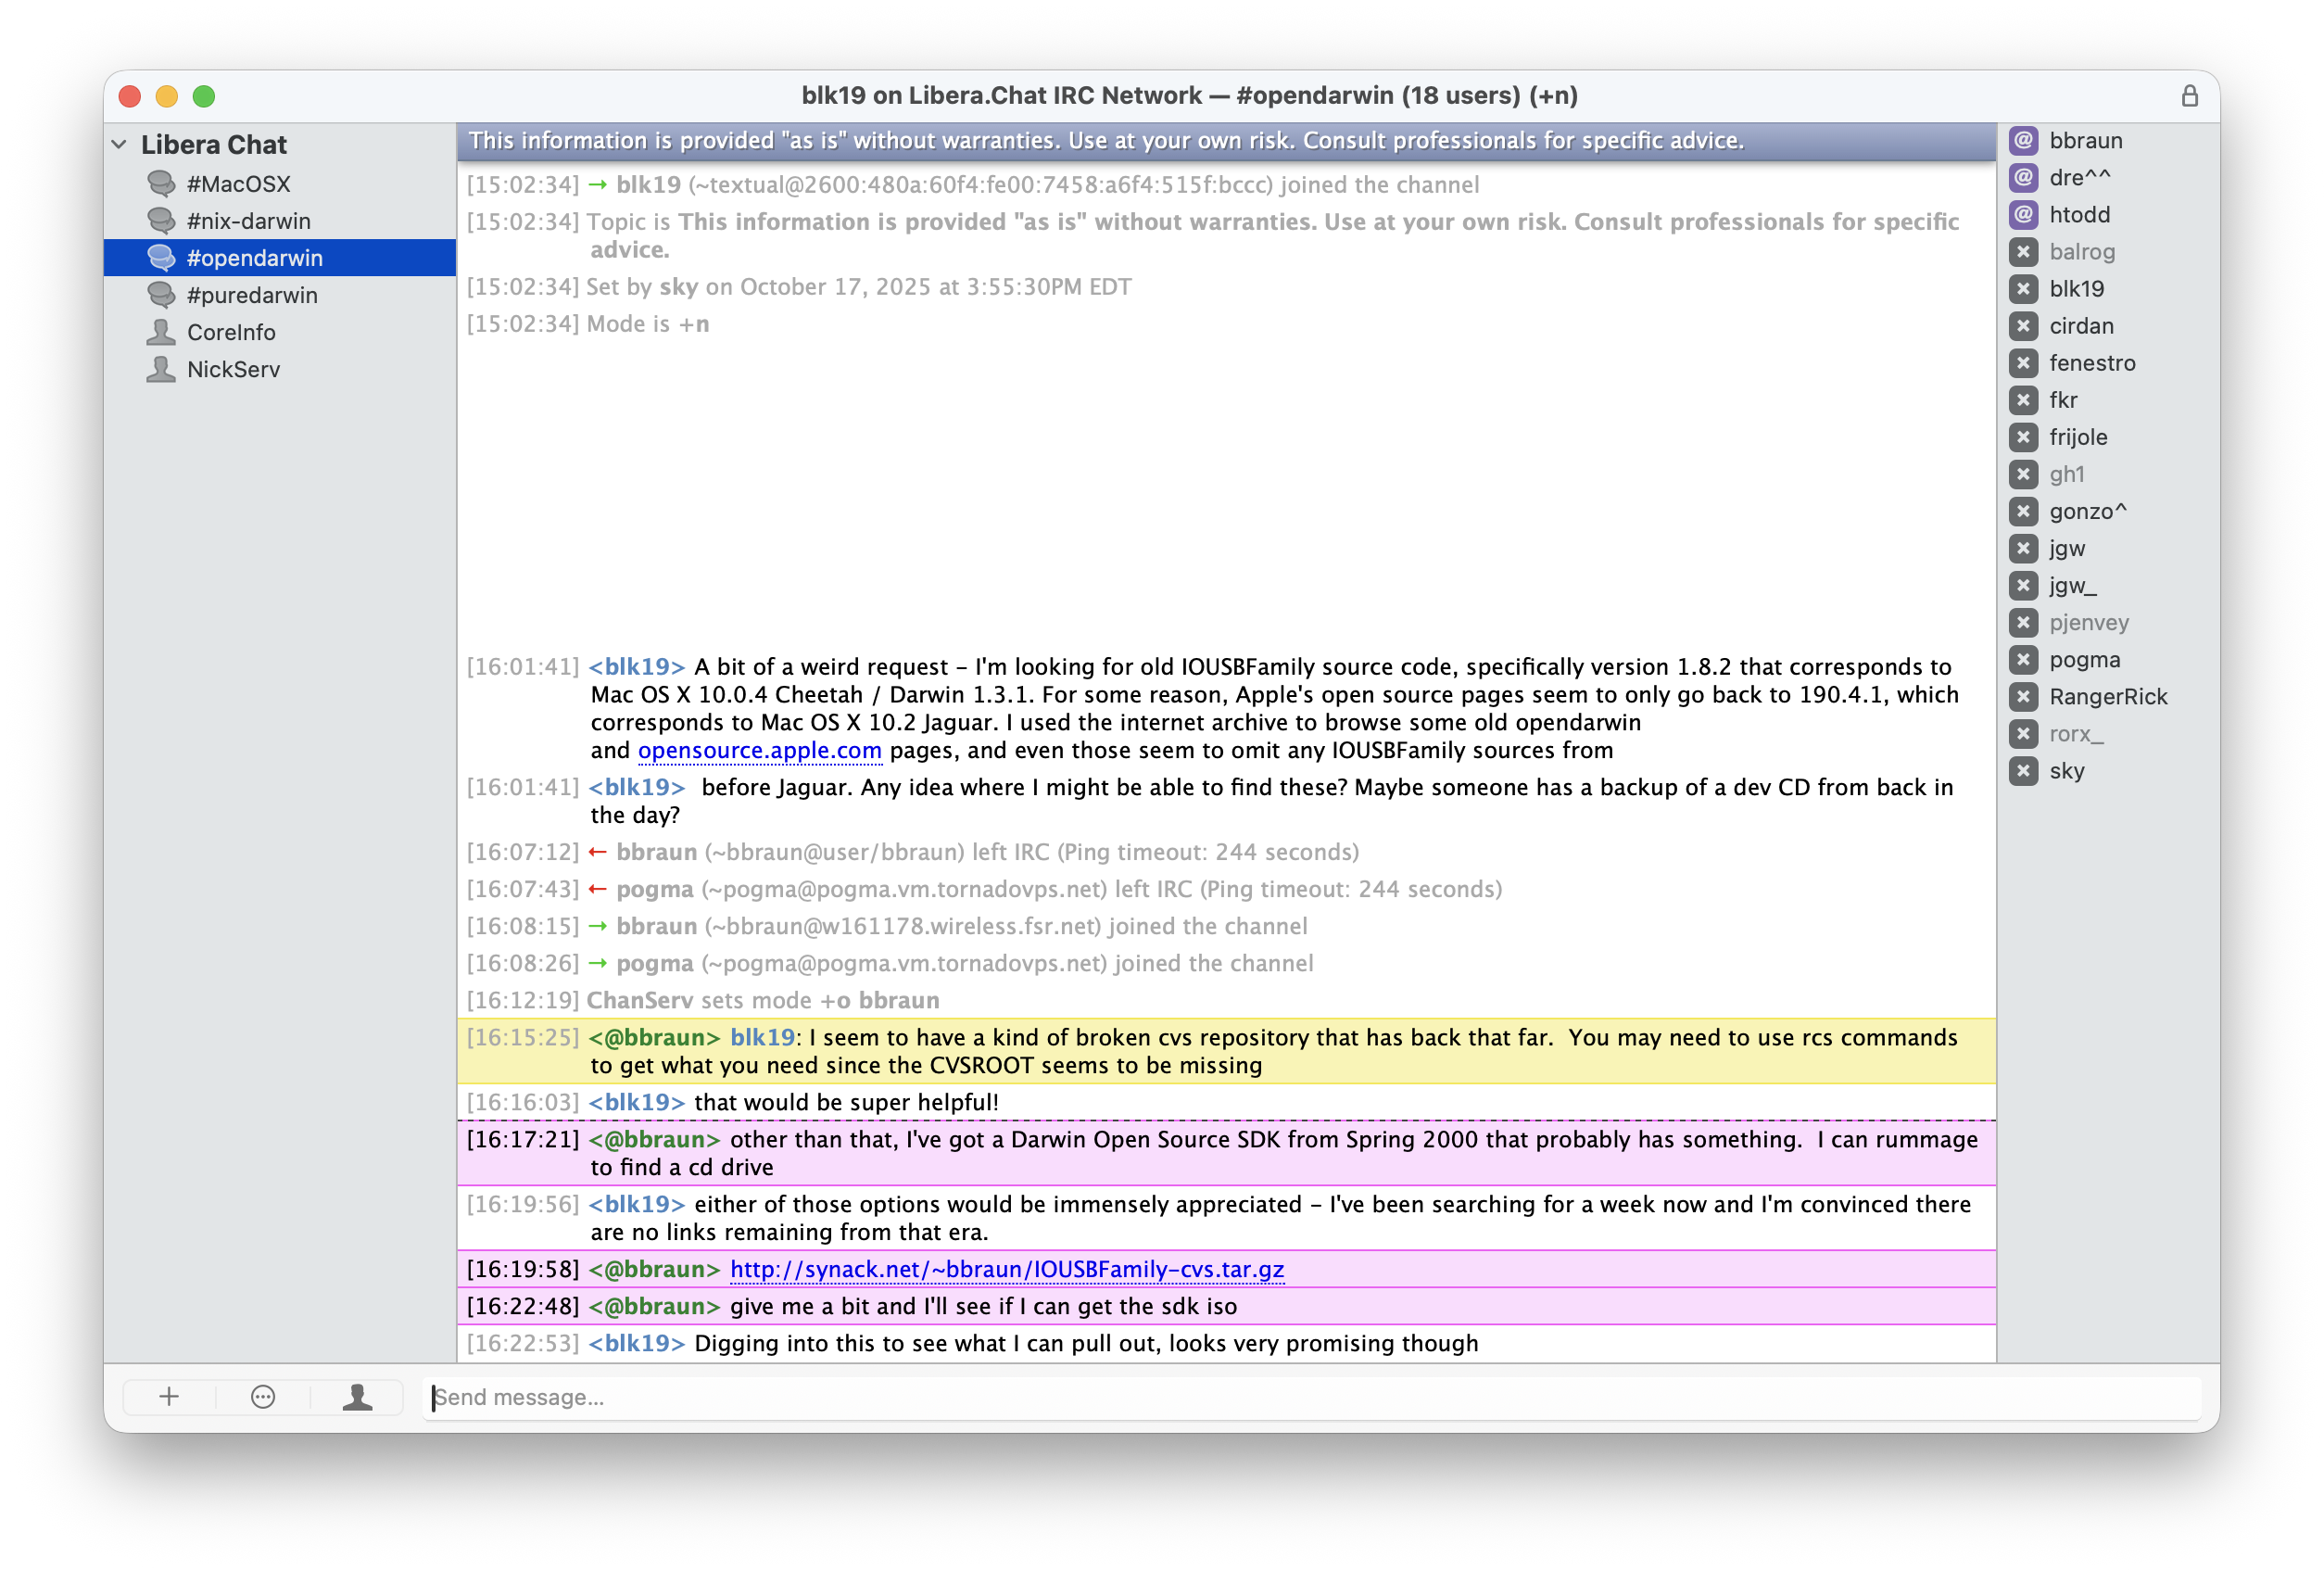
Sure enough, the CVS repository that @bbraun (of synack.net) provided had every file needed to build IOUSBFamily for Mac OS X Cheetah. If you’re reading this - thank you for helping an internet-stranger out :)
With IOUSBFamily patched and built from source, my USB keyboard and mouse were able to control the system, turning the Wii into a usable Mac OS X computer in the process.

Making Things Good ™
Improving the Bootloader
To support the use case of going through a full Mac OS X installation flow, I needed to add support for booting from different partitions on the same SD card (one for the installer, one for the installed-system). The approach I took was to revamp the boot menu to list all bootable partitions, allowing the user to select the one they’d want to boot from by cycling through the available options.
To list the available partitions, I needed to parse the Apple partition Map (APM) at sector 1 of the SD card. Once parsed, I could get the offsets, filesystem types, and names of each partition on the disk:
Next, I wanted to add the ability to boot from an unmodified installer and system partition - eliminating the need to replace drivers or the kernel after installing or updating Mac OS X. To accomplish this, I needed to make the bootloader, rather than the kernel, responsible for loading all of the Wii-specific drivers. Thankfully, Mac OS X has support for injecting bootloader-loaded drivers via the /chosen/memory-map node of the device tree. This node contains entries for each bootloader-loaded driver:
/
└── chosen
	└── memory-map
    	├── Driver-4d6000
      	├── Driver-4d7000
        ├── Driver-4d8000
        ├── Driver-4d9000
        ├── Driver-4da000
            etc.
Each entry contains an address that points to a driver entry structure in memory:
typedef struct driver_info  {
    char *info_plist_start;
    u32 info_plist_size;
    void *bin_start;
    u32 bin_size;
} driver_info_t;
Which itself contains pointers to driver binaries and Info.plist files that were loaded into memory.
To load drivers and build the memory-map node of the device tree, the bootloader recursively searches the FAT32 support partition for any kernel extension (kext) bundles, loading binary and Info.plist pairs for each one that it finds. Here’s an example kext bundle structure:
SomeDriver.kext
	└── Contents
    	├── Info.plist
        └── MacOS
        	└── SomeDriver
        └── PlugIns
        	└── SomeOtherDriver.kext
After implementing driver-loading in the bootloader, I could now boot from unmodified Mac OS X installer and system partitions, simplifying the installation process and making the Wii act even more like a real Mac.
Simplifying the Kernel
By moving drivers out of the kernel, the number of kernel modifications needed to get the system running on the Wii was reduced to just the following:
- Patched BAT setup for the Wii’s I/O address and framebuffer memory
- Support for getting the I/O base address from a device tree node named “hollywood”
- Framebuffer cache-coherency fixes
Separating the drivers from the kernel makes it easier to reason about the kernel, reduces build times when developing drivers, and paves the way for supporting systems like Mac OS X 10.1 Puma, which moved several families of drivers out of the kernel and onto the root filesystem.
Closing Thoughts
There’s something deeply satisfying about accomplishing something that, at the start, you weren’t even sure was possible.
I first had the idea for this project back in 2013 - when I was a sophomore in college. For over a decade, it sat on the back burner; it’s easy to put off a project like this, especially when your day job already involves solving technical problems.
Last year, when I saw that Windows NT had been ported to the Wii, I felt a renewed sense of motivation. Even if my lack of low-level experience resulted in failure, attempting this project would still be an opportunity to learn something new.
In the end, I learned (and accomplished) far more than I ever expected - and perhaps more importantly, I was reminded that the projects that seem just out of reach are exactly the ones worth pursuing.
April 2026