[1]: https://github.com/rstudio/cheatsheets/blob/main/plotnine.pd...
Although I've used Python professionally a lot more than R, I still felt like R was better at this. Somehow opening files in Python always feels a bit more "heavy". I don't really know why, though.
... I love the idea of a new python plotting library, but why is this anti-pattern so common with plotting libs?
Disclaimer: I made the plotnine homepage and cheatsheet.
Whilst it's still not yet at 1.0.0, it's not that new: the first (0.1.0) release was in 2017: https://pypi.org/project/plotnine/#history
(Both has2k1 and I work for Posit, which supports plotnine work, but authoring its guide was mostly an act of passion for me :)
You get so much more information in plots using bokeh (or I assume plotly).
Tooltips, zooming, interaction.
And the LLM helps a lot when the plot is a bit more complex.
Semi related -- I made a little d3.js AI wrapper that works pretty well for making quick charts -- https://prompt2chart.com/share/e998a3f6-9482-4c18-931f-a4513...; https://prompt2chart.com/;
Altair and Bokeh are also quite good for interactive graphs, but plotnine is so ergonomic.
In almost any situation you either want to talk about the actual distribution (in which case plotting the distribution on one side of the line arranged horizontally is significantly superior to plotting it vertically on both sides of the line for some reason as a violin plot does[1]) or you want to talk about the quartiles etc in which case a boxplot is better.
A violin plot tries to do both and as a result does them both badly.
Extended anti-violin plot rant here https://www.youtube.com/watch?v=_0QMKFzW9fw
[1] I remember in one meeting before I knew better, producing some violin plots and putting them on a slide and I knew I had gone wrong when that slide came up and everyone in the room had this confused expression on their faces and was leaning their head over to the side to try to see the distribution better. When your visualization produces obvious confusion like that, you can be completely certain it has failed.
You can get a sneak peek by installing the pre-release:
pip install --pre plotnine
Details here: https://github.com/has2k1/plotnine/issues/1031
Disclaimer: I'm the author.
https://williamcotton.github.io/algraf
It pairs well with a related data translation DSL:
https://williamcotton.github.io/pdl
And you can see the two working together here:
https://williamcotton.github.io/datafarm-studio
There's LSPs for both, LSP clients for VS Code, and even language diagnostics for standalone Monaco editors in the browser.
Of note is that the same language diagnostics are exposed via the WASM as via the LSP interface allowing for the same friendly red squiggles to look and work the same in both your browser with Monaco and your editor with the LSP!
2 things that would be awesome are interactive plots (hover + text box) and chlorpleth (tiled map) plots.
On closer look you have already nailed the latter!
(Disclosure: I'm at Posit, which supports plotnine.)
1. Whether to summarize data by a handful of summary statistics or a full density. Obviously, some statistics reported in isolation can misrepresent the underlying distribution, but these considerations ultimately depend on what specific point one seeks to make with a plot. There's no reason a priori that visually annotating summaries/quantiles on a distribution plot can't be helpful (quite the contrary).
2. Whether to "smooth the data" (read: perform kernel density estimation). In some sense this is a long-solved problem: there are mathematically grounded methods for estimating the optimal KDE bandwidth (with varying degrees of assumption on the underlying distribution), which are what's used by any serious plotting library. And whether authors adequately describe what they're actually plotting is a separate matter. That said, there are many reasons not to show a KDE over, say, a binned histogram, especially with raw data and/pr small sample sizes, but these are entirely orthogonal to the choice of displaying a KDE as a violin plot versus something else.
3. How to normalize densities. With raw data, you probably want to compare frequencies (a proper pdf). If displaying just a single distribution, there's obviously no reason not to show the density (it's only a trivial rescaling of the axis tick values). When comparing multiple, the decision again depends on the point of the plot. Losing dynamic range for broader densities when compared with narrower ones can be counterproductive. E.g., in Bayesian parameter inference (where the data are MCMC samples), we almost never compute the actual normalization factor, but rather want to compare relative probabilities (i.e., within a single distribution) of different parameter values across different distributions. Of course, nothing forces one normalization over another for violin plots.
All of those are separate (and rectifiable!) issues from the defining characteristics of a violin plot:
1. Distributions displayed vertically rather than horizontally (both being harder to interpret and inappropriately suggestive). We almost exclusively visualize functions plotted vertically across a horizontal coordinate. I think this is the only valid, specific criticism of the common violin style itself, but the fix is of course trivial.
2. Horizontal violin are then only different from a ridge plot by a) not overlapping (which to me is a major improvement over standard ridge plots, but also trivially fixed) and b) being displayed symmetrically. I find it slightly easier to compare relative heights in the symmetric version, especially when comparing many distributions (such that each is relatively narrow). Even if not, the difference is so superficial/trivial that I don't find it worth arguing about.
Beyond this, the video's main argument (repeated every minute) seems to be that "it's bad, it's just bad", but there are only so many ways to make a 5 minute argument fill a 42 minute video. (This style of video is so grating to me.)
For showing distributions, I much prefer strip plots (https://seaborn.pydata.org/generated/seaborn.stripplot.html), perhaps with opacity, or swarm plots (https://seaborn.pydata.org/generated/seaborn.swarmplot.html) - no averaging with an unknown kernel, no hiding distributions behind a box plot, and the data is directly visible. We also directly see whether it is based on 5, 100, or many more points.
When using histograms, binning is usually more straightforward than kernels. And in any case, the mirror reflection of a histogram is not needed.
Disclaimer: I am the author of plotnine.
PS. It took someone in the comments writing "import plotnine as p9" for me to understand it isn't plotLine.
https://quesma.com/blog/sandboxing-ai-generated-code-why-we-...
Good, that ggplot2 can run inside in WASM, vide https://github.com/QuesmaOrg/webr-ggplot-playground
When a mathematical formalism exists, just use that. Other approaches just reinvent the wheel on an ad-hoc/piecemeal basis and end up making all sorts of unnecessary compromises.
$ which ggplot
ggplot () {
if [[ "$1" == "-f" ]]
then
shift
rush run --library tidyverse "$(cat "$1")" -
else
rush run --library tidyverse "$@" -
fi
}
$ echo "one,two,three\n1,2,3\n4,5,6\n,7,8,9" | ggplot 'ggplot(df, aes(one, two)) + geom_col() + theme_minimal()' | imgcat
...is just very slow. Booting R just to run ggplot2 was not cutting it compared to a custom DSL written in Rust!BTW, that "R on the command line" tool was inspired by:
Plotnine is a data visualization package for Python based on the grammar of graphics, a coherent system for describing and building graphs. The syntax is similar to ggplot2, a widely successful R package.
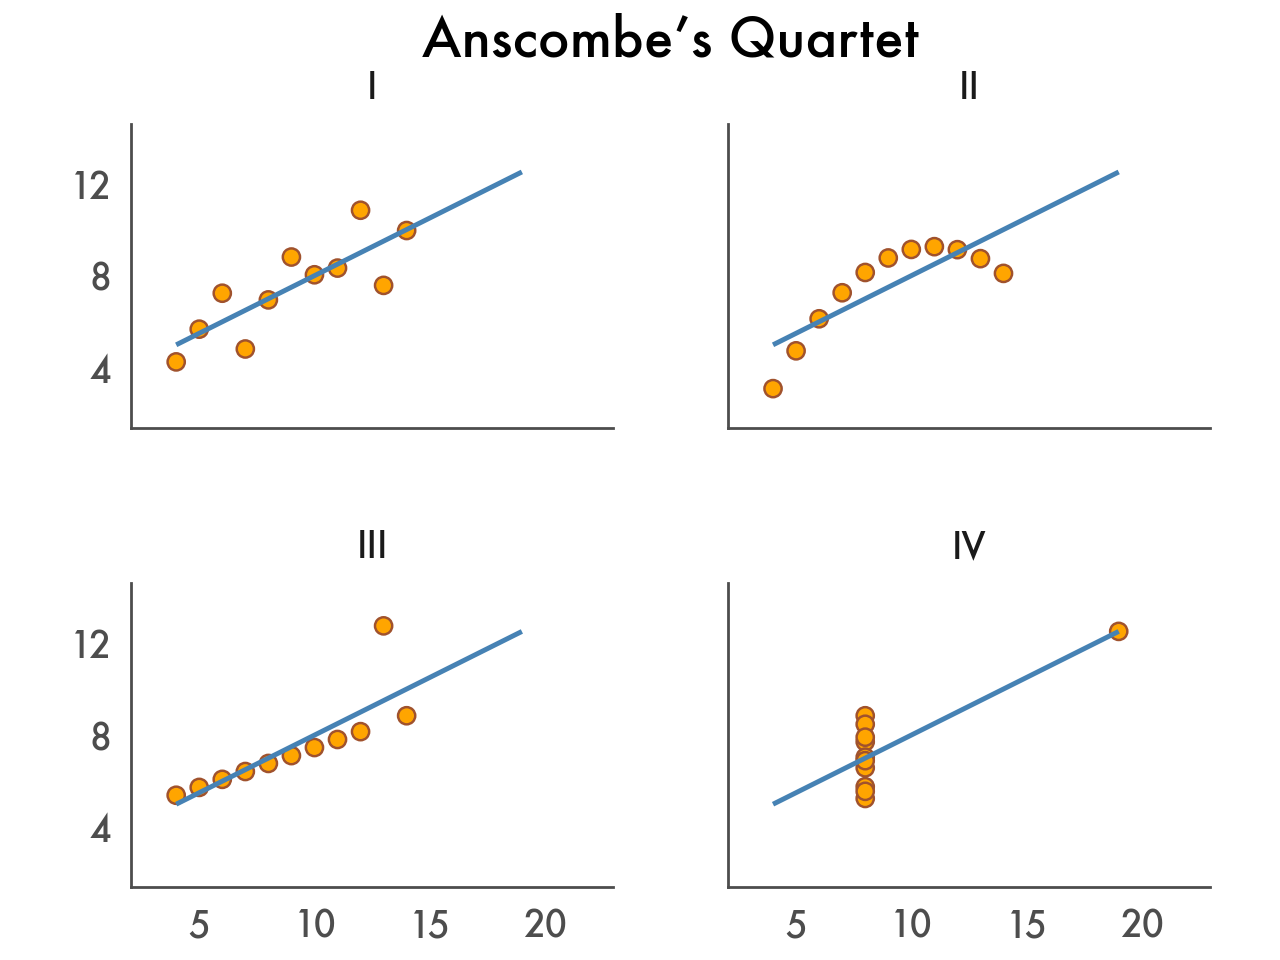
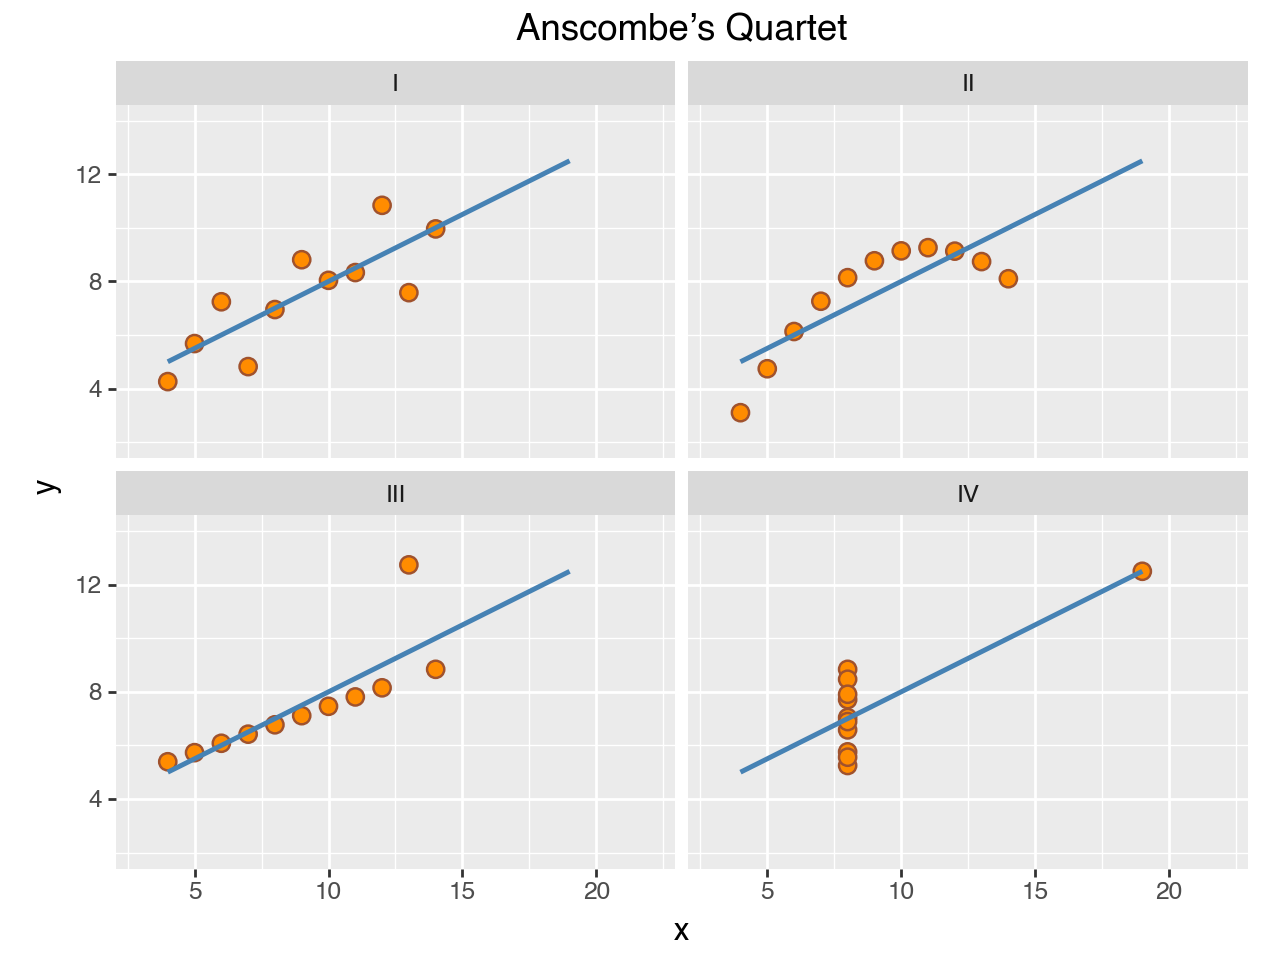
Let’s explore Plotnine’s features and walk through a typical workflow by visualizing Anscombe’s Quartet—four small datasets with different distributions but nearly identical descriptive statistics. They’re perhaps the best argument for visualizing data. You can see the final result belowon the right.

With Plotnine you can create ad-hoc plots with just a single line of code.
from plotnine import * from plotnine.data import anscombe_quartet
ggplot(anscombe_quartet, aes(x="x", y="y")) + geom_point()
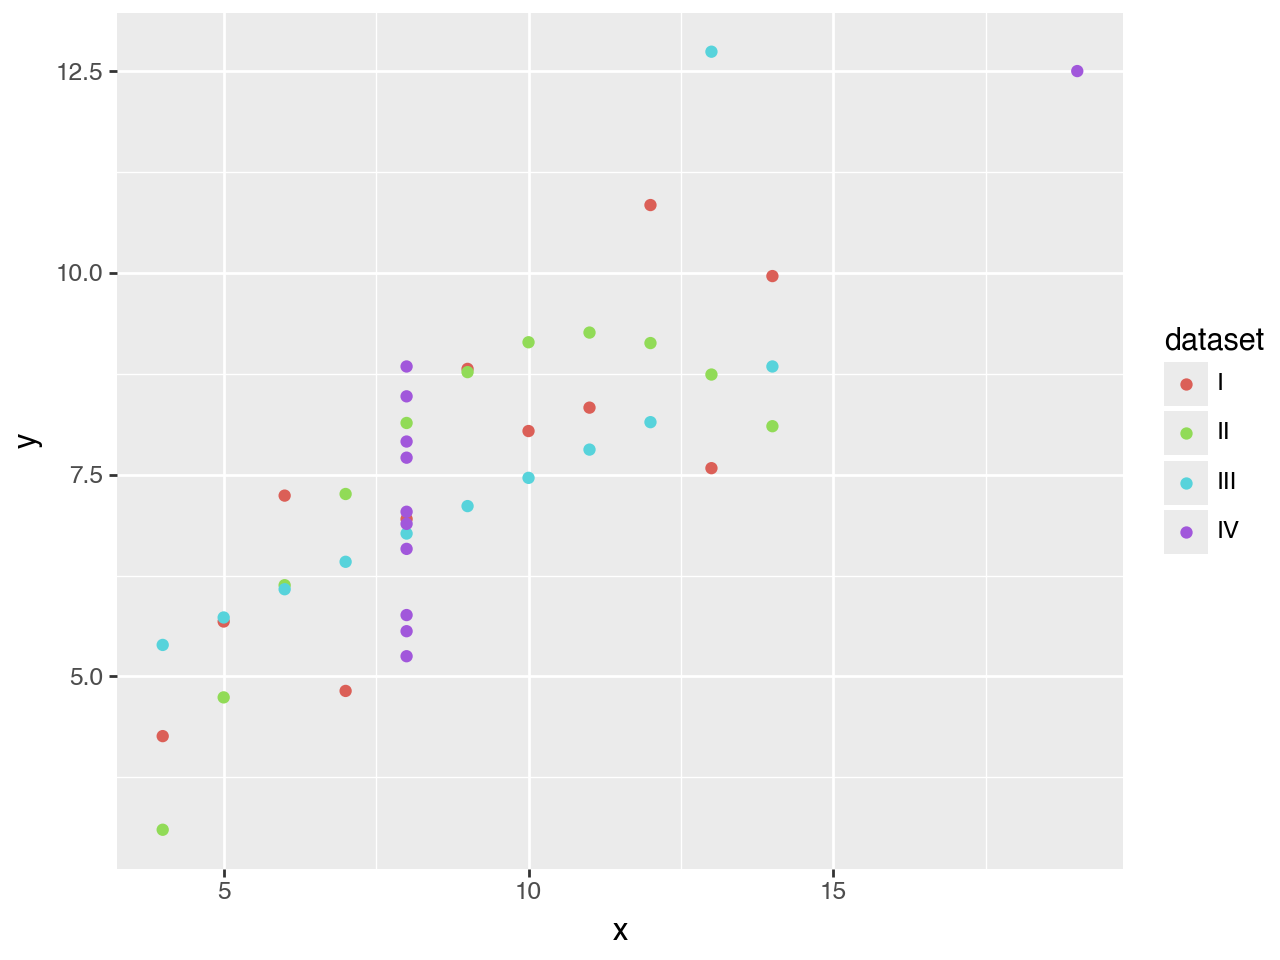
Our data contains two continuous variables, so let’s start with a basic scatter plot.
It doesn’t make much sense just yet; we need a way to distinguish between the four datasets.

Legends, labels, breaks, color palettes. Many elements are added automatically based on the data.
By coloring each point according to the dataset it belongs to, the plot automatically gets a legend. The colors are chosen automatically as well. But don’t worry, as we’ll see later, everything can be adjusted.
It’s still rather messy, so let’s try a different approach.
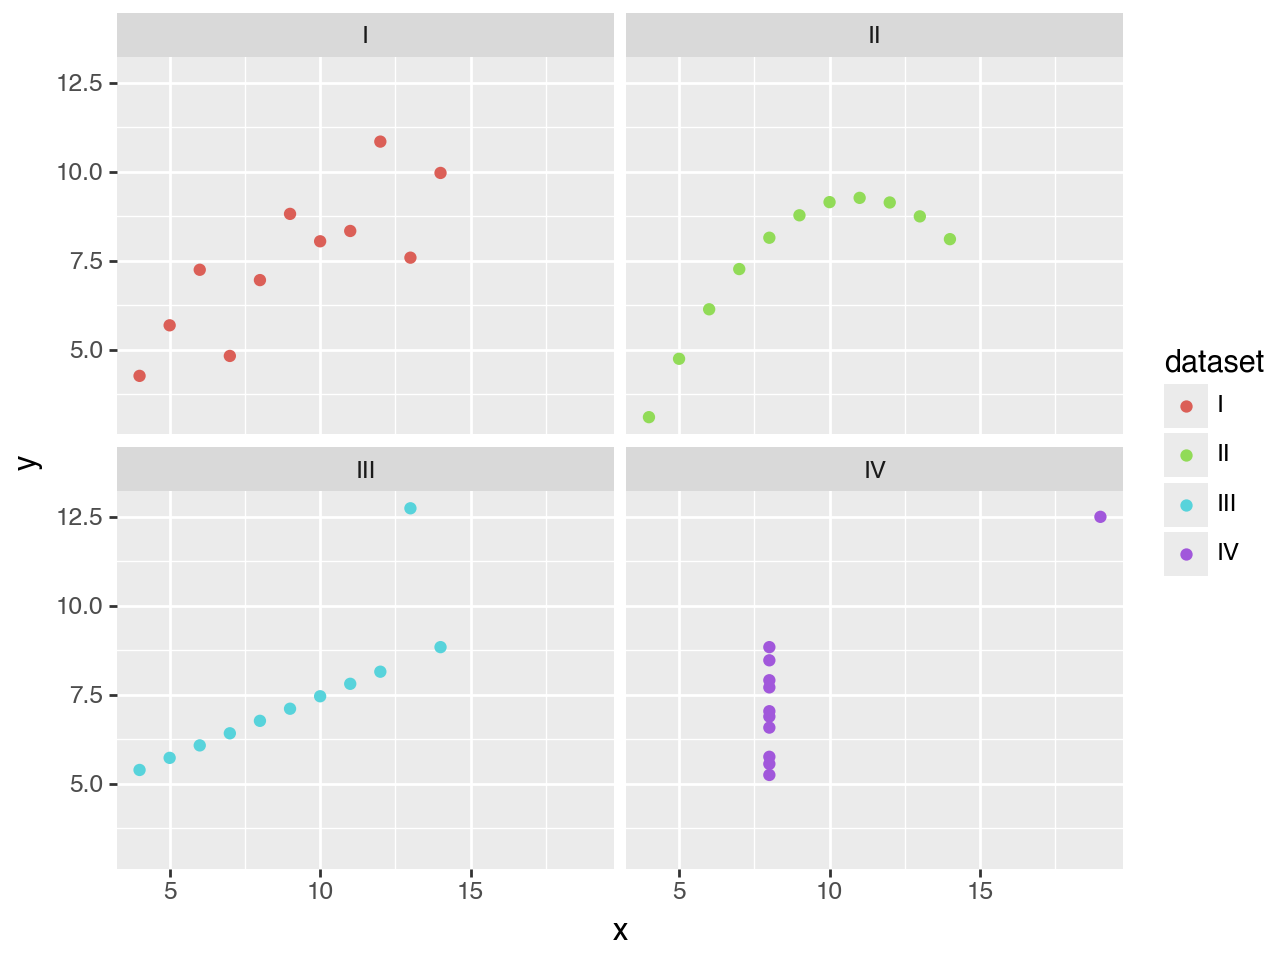
Any data visualization can be repeated across multiple panels without writing a for loop.
That’s better. The panels make the use of color redundant, so that’s something we need to fix.
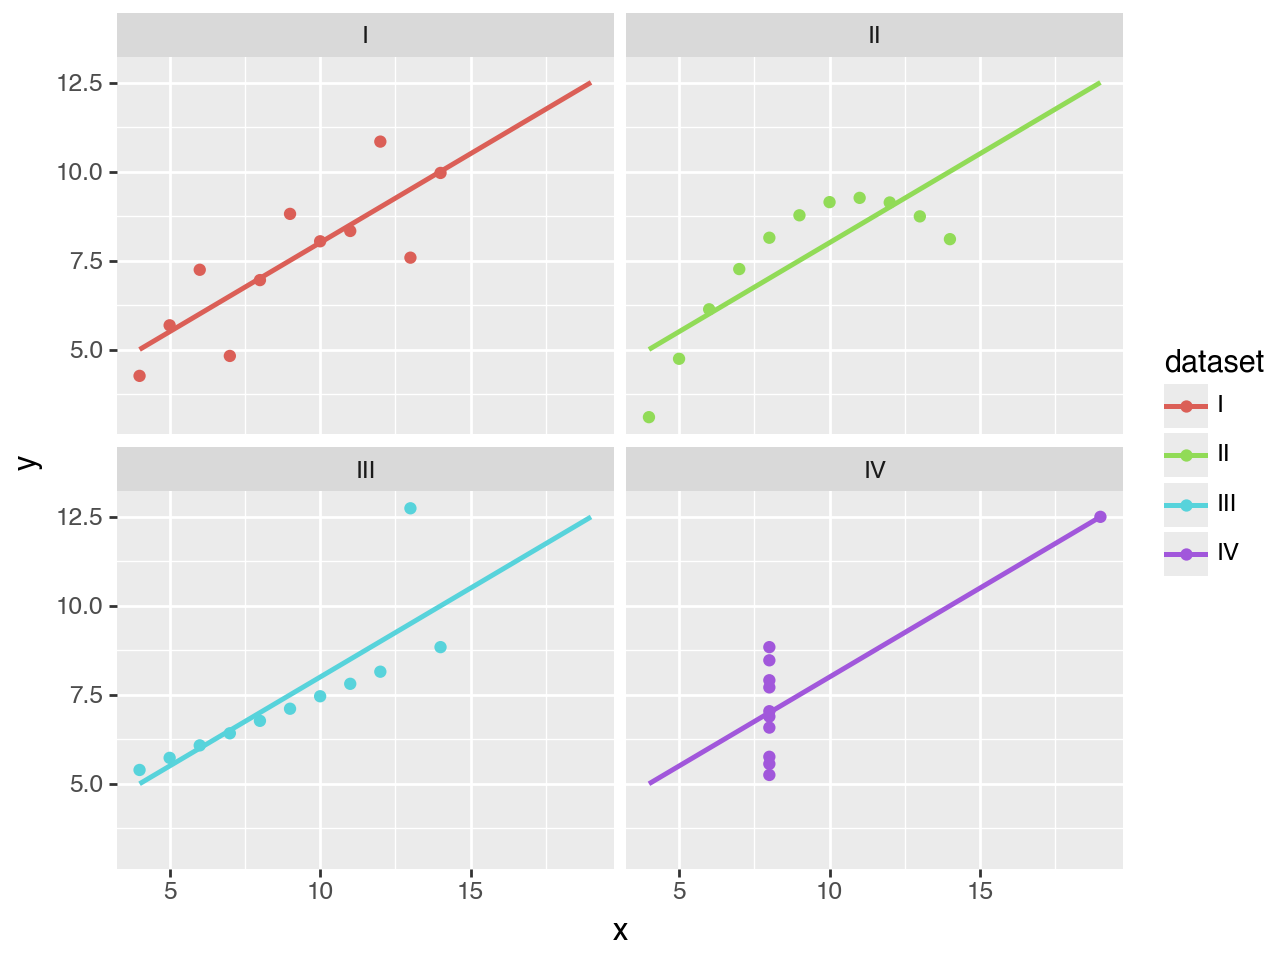
The data and the mapping of columns are inherited, but can be changed per layer.
These scatter plots with trend lines clearly supports Anscombe’s point: that datasets with different distributions can have the same descriptive statistics.
When you’re doing exploratory data analysis, this plot might be good enough. But when you want to publish this, you may want to customize it further.

Anything that you see, can be adjusted.
( ggplot(anscombe_quartet, aes("x", "y")) + geom_point(color="sienna", fill="darkorange", size=3) + geom_smooth(method="lm", se=False, fullrange=True, color="steelblue", size=1) + facet_wrap("dataset") + scale_y_continuous(breaks=(4, 8, 12)) + coord_fixed(xlim=(3, 22), ylim=(2, 14)) + labs(title="Anscombe’s Quartet") )
Here we change the sizes and colors, improve the breaks, and add a title.

Finally, customize the theme to match your personal style or your organization’s brand.
( ggplot(anscombe_quartet, aes("x", "y")) + geom_point(color="sienna", fill="orange", size=3) + geom_smooth(method="lm", se=False, fullrange=True, color="steelblue", size=1) + facet_wrap("dataset") + labs(title="Anscombe’s Quartet") + scale_y_continuous(breaks=(4, 8, 12)) + coord_fixed(xlim=(3, 22), ylim=(2, 14)) + theme_tufte(base_family="Futura", base_size=16) + theme( axis_line=element_line(color="#4d4d4d"), axis_ticks_major=element_line(color="#00000000"), axis_title=element_blank(), panel_spacing=0.09, ) )
There you have it, we started with a single line of code, and incrementally improved and customized our data visualization.
Curious how you can start creating these kinds of visualizations with your own data? In the next section we cover how to install Plotnine.
